

OpenSearch comes with a rich set of built-in analyzers. As we explored in our indexing the OpenSearch Text Field Data Type tutorial, the standard analyzer is automatically applied to Text mappings by default and does a great job. However, you may have specific business rules that require an OpenSearch Custom Analyzer. By leveraging these powerful configurations you can fine tune the rules of character filters, the tokenizer and token filters to meet your needs.
Much like building a dotnet class, custom OpenSearch analyzers are composed with low-level building blocks defined by the framework (similar to primitive types). In defining a custom analyzer, we simply define how they should behave.
The code samples mentioned in this article can be found in the CodeSloth GitHub code sample repository. These examples consume the .Net OpenSearch client for interacting with an AWS OpenSearch cluster running in Docker on the local machine.
OpenSearch Analyzer Fundamentals
An OpenSearch analyzer is composed from three different parts:
- Zero or more character filters
- A tokenizer
- Zero or more token filters
Let’s take a look at an example below that uses both built-in and user defined components.
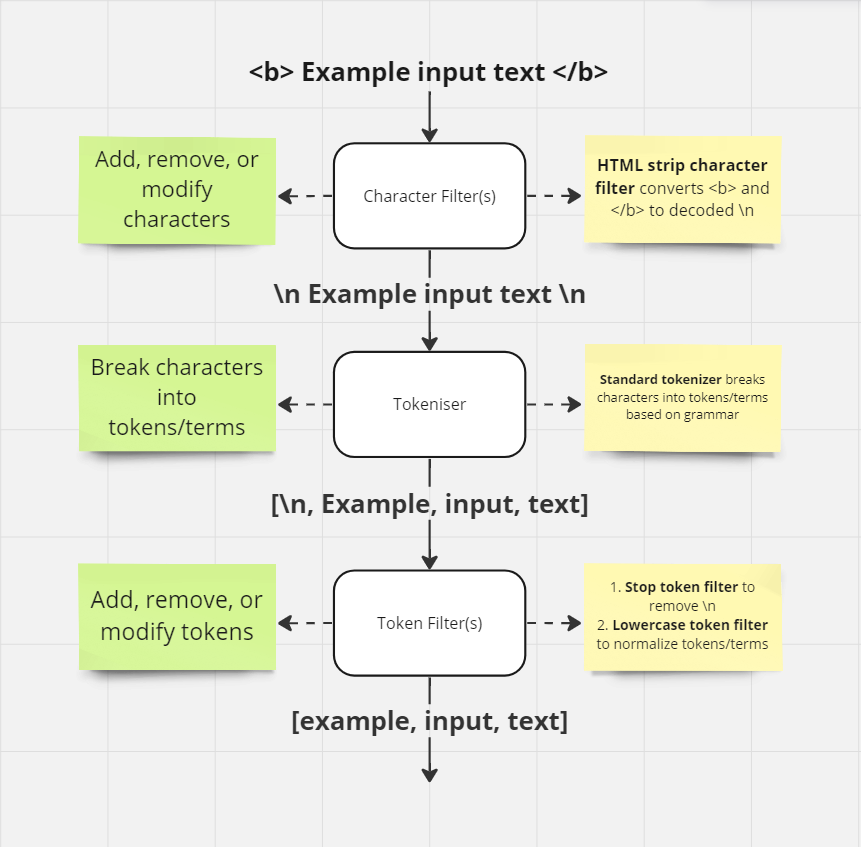
In the example above, we have a character stream
<b> Example input text </b>
Which after character filtering, tokenization and token filtering, eventually becomes three tokens
example
input
text
Let’s dig into each of these different steps.
OpenSearch Character Filters
Character filters in OpenSearch are the first part of the text-analysis pipeline. They take a text stream and can add, remove or change characters within it.
Zero or more character filters may be configured within an analyzer. At time of writing there are 3 built-in character filters:
In the image above, we demonstrated the html strip character filter, which strips HTML elements from text and replaces them with their decoded value. Therefore, we see <b> and </b> become \n.
The example is a little redundant though. Replacing these characters with new lines, only to then strip those tokens in the final phase performs an unnecessary step, but allowed for a simple demonstration of the possibilities of each moving piece in the pipeline.
OpenSearch Tokenizers
The tokenizer is responsible for taking an alphanumeric stream produced by the character filter and breaking it down into individual tokens (synonymously referred to as terms).
For example, the Standard Tokenizer when given our example stream above
/n Example input text /n
Produces the following terms/tokens:
/n Example input text
Each term or token then has an associated count that describes the number of times that it was found within the given input stream. In our example above, the space between words was used to break the stream into tokens and the /n would be counted twice.
If we look at a slightly more complex example:
"This is a sentence! It contains some, really bad. Grammar; sentence"
This will produce the following terms/tokens:
a
bad
contains
Grammar
is
It
really
sentence
some
This
Here, we can see that commas leading into spaces, full stops, semicolons, exclamation marks etc, have triggered tokenisation.
The terms produced during tokenization result from specific rules defined within the tokenizer. The standard tokenizer looks for common grammatical and punctuation markers to decompose the string stream.
At time of writing, there are many built-in tokenizers to choose from:
- Character group
- Classic
- Edge n-gram
- Keyword
- Letter
- Lowercase
- N-gram
- Path hierarchy
- Pattern
- Simple pattern
- Simple pattern split
- Standard
- Thai
- UAX URL email
- Whitespace
OpenSearch Token Filters
The final step in the pipeline of an OpenSearch analyzer is token filtering. Once the tokenizer has produced an array of individual tokens, zero or more token filters may add, remove or modify tokens. It is important to establish that the token filter cannot modify individual characters within the tokens, only the tokens themselves.
There are even more token filters than tokenizers at time of writing:
- Apostrophe
- ASCII folding
- CJK bigram
- CJK width
- Classic
- Common grams
- Conditional
- Decimal digit
- Delimited payload
- Dictionary decompounder
- Edge n-gram
- Elision
- Fingerprint
- Flatten graph
- Hunspell
- Hyphenation decompounder
- Keep types
- Keep words
- Keyword marker
- Keyword repeat
- KStem
- Length
- Limit token count
- Lowercase
- MinHash
- Multiplexer
- N-gram
- Normalization
- Pattern capture
- Pattern replace
- Phonetic
- Porter stem
- Predicate script
- Remove duplicates
- Reverse
- Shingle
- Snowball
- Stemmer
- Stemmer override
- Stop
- Synonym
- Synonym graph
- Trim
- Truncate
- Unique
- Uppercase
- Word delimiter
- Word delimiter graph
Token Filtering and Token Normalization
It is during token filtering that normalization should occur.
Normalization is the process of producing “lowest common denominator” tokens. It can be applied both at indexing and search/query time. The Standard Analyzer achieves this by using the Lowercase token filter.
For a match to occur on a given term, it must be an exact match. This means the alphanumeric content of the token, any special characters as well as character case. Even in the context of full-text search algorithms such as prefixes, ngrams or shingles, each prefix, indvidual ngram or shingle must be an exact match; it is the number of these exact matches that adds up to a relevance score for the document (alongside other weightings etc).
In the image above, we saw the token Example normalize to example. This means that the actual indexed term for that document is example. If a search query was not lowercase normalized and produced the token Example, it would not match with the lowercase normalized token example that was indexed on the document and the search would not return a result. Only if the search query lowercase normalized the token Example to example would it produce an exact match for the term on the indexed document and allow it to be returned as a search result.
Case sensitivity may be desirable for some search algorithms, but for the majority of full text search experiences it is not important and lowercase normalization should be applied so the sequence of characters (not their casing) forms the foundation of term matching.
Creating an OpenSearch Custom Analyzer
Now that we have covered the fundamentals, let’s create a custom analyzer using the dotnet OpenSearch.Net NuGet package to perform the steps captured in the image above. We’ll be working with the CustomAnalyzer_ExecutesCharacterFilterThenTokenizerThenTokenFilters method from the Code Sloth Search Samples repo.
Let’s take a look at our setup code
var indexName = "custom-analyzer";
var testAnalyzerName = "test-analyzer";
var customStopWordFilterName = "my_custom_stop_words_filter";
var createIndexDescriptor = new CreateIndexDescriptor(indexName)
	.Settings(settings => settings
		.Analysis(analysis => analysis
			.Analyzers(analyzers => analyzers
				.Custom(testAnalyzerName, descriptor => descriptor
					.CharFilters("html_strip")
					.Tokenizer("standard")
					.Filters(customStopWordFilterName, "lowercase")
				)
			)
			.TokenFilters(tokenFilters => tokenFilters
				.Stop(customStopWordFilterName, filter => filter
					.StopWords("/n")
					)
				)
			)
		)
	.Map<ProductDocument>(mapping => mapping
		.Properties(properties => properties
			.Text(text => text
				.Analyzer(testAnalyzerName)
				.Name(prop => prop.Description)
				)
			)
		);
While intimidating a first, the setup code can be viewed as multiple parts:
Settings is where we define custom analyzer components. Mappings are where we use those custom components.
- Settings -> Analysis -> Analyzers -> Custom
- This is where we define a custom analyzer, taking:
CharFilters. This defines our usage of the built-inhtml stripcharacter filterTokenizers. This defines our usage of the built-instandardtokenizerFilters(token filters). This defines two token filters:- A user-defined
stop wordstoken filter, to remove/ntokens - A built-in
lowercasetoken filter to lowercase normalise all tokens
- A user-defined
- This is where we define a custom analyzer, taking:
- Settings -> Analysis -> TokenFilters
- This is where we define the rules for our custom
Stoptoken filter
- This is where we define the rules for our custom
- Map
- This is where we define the mapping for our document, and tell it to use the custom analyzer on our text mapping
You’ll notice that these mappings are very stringly-typed. For this reason, common names are lifted out into local variables and shared between the definition of a custom component, and the location where that custom component is consumed.
For example, customStopWordFilterName can be seen being used to name a TokenFilters(..Stop()) definition, and also consumed in the Filters(...) call. This mitigates typos that could be tricky to debug, which could cause the analyzer to behave in an unexpected way, or throw an error during index creation.
Analyzing the Creation of an OpenSearch Custom Analyzer
Place a breakpoint after the line where the index is created
var indexCreationResult = await _fixture.OpenSearchClient.Indices.CreateAsync(indexName, descriptor => createIndexDescriptor);
When we inspect the DebugInformation of the indexCreationResult we can see both the HTTP request that was sent to the OpenSearch cluster and the response.
Valid OpenSearch.Client response built from a successful(200)low level call on PUT: /custom-analyzer?pretty=true&error_trace=true
# Audit trail of this API call:
 - [1] HealthyResponse: Node: http:/ / localhost: 9200 / Took: 00: 00: 01.0004939
 # Request: {
    "mappings": {
        "properties": {
            "description": {
                "analyzer": "test-analyzer",
                "type": "text"
            }
        }
    },
    "settings": {
        "analysis": {
            "analyzer": {
                "test-analyzer": {
                    "char_filter": ["html_strip"],
                    "filter": ["my_custom_stop_words_filter", "lowercase"],
                    "tokenizer": "standard",
                    "type": "custom"
                }
            },
            "filter": {
                "my_custom_stop_words_filter": {
                    "stopwords": ["/n"],
                    "type": "stop"
                }
            }
        }
    }
}
 # Response: {
    "acknowledged": true,
    "shards_acknowledged": true,
    "index": "custom-analyzer"
}

 # TCP states:
Established: 51
TimeWait: 61
CloseWait: 4

 # ThreadPool statistics:
Worker:
Busy: 1
Free: 32766
Min: 12
Max: 32767
IOCP:
Busy: 0
Free: 1000
Min: 12
Max: 1000
The generated HTTP request has very much the same shape as our dotnet code. It defines all of the major parts: our custom analyzer, our custom token filter and the mapping that consumes the custom analyzer in the two primary areas of settings and mappings.
We can then view the settings and mappings through their own specific queries.
Continue stepping through to capture settingResult and observe its DebugInformation. When querying for index settings, we are able to view the custom analyzers that we define, alongside other adjacent index settings, such as the number of shards.
Valid OpenSearch.Client response built from a successful (200) low level call on GET: /_settings?pretty=true&error_trace=true
# Audit trail of this API call:
 - [1] HealthyResponse: Node: http://localhost:9200/ Took: 00:00:00.0973740
# Request:
<Request stream not captured or already read to completion by serializer. Set DisableDirectStreaming() on ConnectionSettings to force it to be set on the response.>
# Response:
{
  "custom-analyzer" : {
    "settings" : {
      "index" : {
        "number_of_shards" : "1",
        "provided_name" : "custom-analyzer",
        "creation_date" : "1711668907605",
        "analysis" : {
          "filter" : {
            "my_custom_stop_words_filter" : {
              "type" : "stop",
              "stopwords" : [
                "/n"
              ]
            }
          },
          "analyzer" : {
            "test-analyzer" : {
              "filter" : [
                "my_custom_stop_words_filter",
                "lowercase"
              ],
              "char_filter" : [
                "html_strip"
              ],
              "type" : "custom",
              "tokenizer" : "standard"
            }
          }
        },
        "number_of_replicas" : "1",
        "uuid" : "3_TUx_HZRf69tM2gc2D2bw",
        "version" : {
          "created" : "136217927"
        }
      }
    }
  }
}

# TCP states:
  Established: 59
  CloseWait: 9
  TimeWait: 15

# ThreadPool statistics:
  Worker:
    Busy: 1
    Free: 32766
    Min: 12
    Max: 32767
  IOCP:
    Busy: 0
    Free: 1000
    Min: 12
    Max: 1000
We can then use a mapping query to fetch the document mappings, and observe where custom analyzers are consumed.
Continue stepping through the method and observe mappingResult.DebugInformation.
Valid OpenSearch.Client response built from a successful(200)low level call on GET: /_mapping?pretty=true&error_trace=true
# Audit trail of this API call:
 - [1] HealthyResponse: Node: http:/ / localhost: 9200 / Took: 00: 00: 00.0359264
 # Request:
 < Request stream not captured or already read to completion by serializer.Set DisableDirectStreaming()on ConnectionSettings to force it to be set on the response. >
 # Response: {
    "custom-analyzer": {
        "mappings": {
            "properties": {
                "description": {
                    "type": "text",
                    "analyzer": "test-analyzer"
                }
            }
        }
    }
}

 # TCP states:
Established: 53
TimeWait: 61
CloseWait: 4

 # ThreadPool statistics:
Worker:
Busy: 1
Free: 32766
Min: 12
Max: 32767
IOCP:
Busy: 0
Free: 1000
Min: 12
Max: 1000
This query shows us that we have a single mapping defined for our document, which consumes the stringly-typed custom analyzer.
Now that we have confirmed the analyzer has been configured, and appropriately mapped to our document’s field, we can see it in action!
OpenSearch Custom Analyzer Token Analysis
Continue stepping through the test to the termVectorResult. We issue a term vectors query to see what terms are produced for a given string stream, against a particular field on a document.
Valid OpenSearch.Client response built from a successful(200)low level call on POST: /custom-analyzer/_termvectors ? pretty = true & error_trace = true
     # Audit trail of this API call :
     - [1]HealthyResponse: Node: http: //localhost:9200/ Took: 00:00:00.0245599
     # Request: {
    "doc": {
        "id": 1,
        "description": "<b> Example input text </b>"
    }
}
 # Response: {
    "_index": "custom-analyzer",
    "_version": 0,
    "found": true,
    "took": 1,
    "term_vectors": {
        "description": {
            "field_statistics": {
                "sum_doc_freq": 0,
                "doc_count": 0,
                "sum_ttf": 0
            },
            "terms": {
                "example": {
                    "term_freq": 1,
                    "tokens": [{
                            "position": 0,
                            "start_offset": 4,
                            "end_offset": 11
                        }
                    ]
                },
                "input": {
                    "term_freq": 1,
                    "tokens": [{
                            "position": 1,
                            "start_offset": 12,
                            "end_offset": 17
                        }
                    ]
                },
                "text": {
                    "term_freq": 1,
                    "tokens": [{
                            "position": 2,
                            "start_offset": 18,
                            "end_offset": 22
                        }
                    ]
                }
            }
        }
    }
}

 # TCP states:
Established: 53
TimeWait: 61
CloseWait: 4

 # ThreadPool statistics:
Worker:
Busy: 1
Free: 32766
Min: 12
Max: 32767
IOCP:
Busy: 0
Free: 1000
Min: 12
Max: 1000
Under the terms property of the response JSON object, we can see each of our expected terms: example, input and text. Each term has a term_freq of 1.
The final assertion of our unit test formats this response, taking each returned token and its frequency and asserting that we have one of each.
The full test at time of writing can be seen below
[Fact]
public async Task CustomAnalyzer_ExecutesCharacterFilterThenTokenizerThenTokenFilters()
{
	var indexName = "custom-analyzer";
	var testAnalyzerName = "test-analyzer";
	var customStopWordFilterName = "my_custom_stop_words_filter";
	var createIndexDescriptor = new CreateIndexDescriptor(indexName)
		.Settings(settings => settings
			.Analysis(analysis => analysis
				.Analyzers(analyzers => analyzers
					.Custom(testAnalyzerName, descriptor => descriptor
						.CharFilters("html_strip")
						.Tokenizer("standard")
						.Filters(customStopWordFilterName, "lowercase")
					)
				)
				.TokenFilters(tokenFilters => tokenFilters
					.Stop(customStopWordFilterName, filter => filter
						.StopWords("/n")
						)
					)
				)
			)
		.Map<ProductDocument>(mapping => mapping
			.Properties(properties => properties
				.Text(text => text
					.Analyzer(testAnalyzerName)
					.Name(prop => prop.Description)
					)
				)
			);


	var indexCreationResult = await _fixture.OpenSearchClient.Indices.CreateAsync(indexName, descriptor => createIndexDescriptor);

	// View the settings that define our custom analyzer
	var settingsRequest = new GetIndexSettingsRequest();
	var settingResult= await _fixture.OpenSearchClient.Indices.GetSettingsAsync(settingsRequest);

	// View where the custom analyzer has been mapped to documents
	var mappingRequest = new GetMappingRequest();
	var mappingResult = await _fixture.OpenSearchClient.Indices.GetMappingAsync(mappingRequest);

	var productDocument = new ProductDocument(1, "<b> Example input text </b>");

	var indexRequest = new IndexRequest<ProductDocument>(productDocument, indexName);
	await _fixture.OpenSearchClient.IndexAsync(indexRequest);

	var termVectorResult = await _fixture.OpenSearchClient.TermVectorsAsync<ProductDocument>(selector => selector
		   .Index(indexName)
		   .Document(productDocument)
	   );

	// Each token is parsed from the response, against the number of times it appeared in the given string
	var tokensAndFrequency = termVectorResult.TermVectors.Values.SelectMany(value => value.Terms.Select(term => $"{term.Key}:{term.Value.TermFrequency}"));
	var expectedTokensAndFrequencies = new[] { "example:1", "input:1", "text:1" };
	tokensAndFrequency.Should().BeEquivalentTo(expectedTokensAndFrequencies, options => options.WithStrictOrdering());

	var deleteResponse = await _fixture.OpenSearchClient.Indices.DeleteAsync(indexName);
}
Sloth Summary
Custom analyzers are simple to configure at their core, but may be used in a large range of ways that may be complex to reason about after they have been configured. Understanding why you need a custom analyzer and how it will support your specific business requirements will likely be the greatest challenge you face when considering this in your solution.
In short, custom analyzers contain a pipeline of three parts:
- (0-many) Character filters, which add/remove/modify characters from a text stream
- (1) Tokeniser, which breaks the text stream down into individual parts (tokens, terms)
- (0-many) Token filters, which add/remove/modify tokens produced by the tokeniser
- It is during token filtering that we should consider normalising tokens, such as lowercasing them
Happy searching! 🦥