

Dotnet Docker Compose debugging in Visual Studio lets us simultaneously set breakpoints in multiple running apps. The developer experience is super simple, but behind the scenes, Visual Studio manages a lot of docker compose dotnet complexity for us. This tutorial will show you how to debug Docker dotnet apps with Docker Compose and how Microsoft makes it possible for us.
This article is a continuation of Debugging .Net Core Applications in Docker.
One is Never Enough
While the prior tutorial was essential in covering how Visual Studio generates and consumes Docker files for local .Net Core debugging, the context was contrived. It is not often that we work with solutions that contain just a single executable application with no solution-defined DLLs or infrastructure dependencies.
This tutorial will expand on what we have already learned by building and debugging multiple applications within a single Visual Studio solution. Each project will leverage functionality from a shared DLL that is also defined within the solution and depend on a local instance of Redis for reading or writing data.
Our Base Solution Setup
If following along with another solution setup, feel free to skip to here. Otherwise let’s take a look at the structure we’ll be working with.
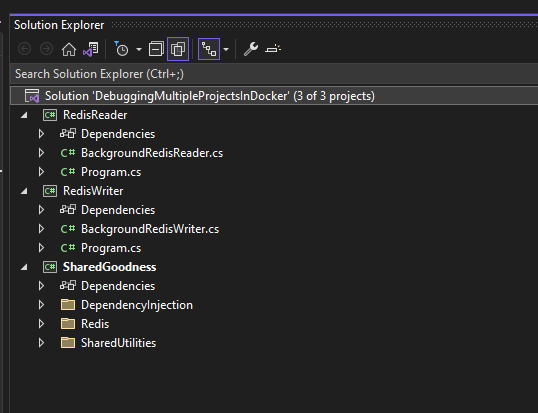
This solution contains the following projects:
- RedisWriter (exe) is a simple
BackgroundServicewhich writes a random integer value to a shared string key in a local Redis instance at a set interval - RedisReader (exe) is a simple
BackgroundServicewhich reads from a local Redis instance at a set interval. The value is read from the shared string key that theRedisWriterwrites to and reflects the updates that it performs on the console - SharedGoodness(dll) is a shared project which defines:
- An abstraction over the Redis cache, facilitating standardised logging
- The shared string key that both services use to interact with Redis
Let’s take a closer look at the setup of each of these projects.
RedisWriter
The BackgroundRedisWriter is the brains of this executable:
- It will continue to loop indefinitely until the cancellation token is signaled
- Each iteration it write a new random number to the same Redis key, overwriting the last value that was persisted and log the value
- It will wait for 2 seconds before writing the next value
using Microsoft.Extensions.Hosting;
using Microsoft.Extensions.Logging;
using SharedGoodness.Redis;
using SharedGoodness.SharedUtilities;

namespace RedisWriter
{
    public class BackgroundRedisWriter : BackgroundService
    {
        ILogger<BackgroundRedisWriter> _logger;
        IRedisRepository _redisRepository;

        public BackgroundRedisWriter(ILogger<BackgroundRedisWriter> logger, IRedisRepository redisRepository)
        {
            _logger = logger ?? throw new ArgumentNullException(nameof(logger));
            _redisRepository = redisRepository ?? throw new ArgumentNullException(nameof(redisRepository));
        }

        protected override async Task ExecuteAsync(CancellationToken stoppingToken)
        {
            var random = new Random();
            while (!stoppingToken.IsCancellationRequested)
            {
                _logger.LogInformation($"Executing again at {DateTime.Now.PrettifyDate()}");

                var valueToWrite = random.Next(0, 1000000);

                await _redisRepository.WriteToRedis(RedisConstants.RedisKey, valueToWrite.ToString());

                _logger.LogInformation($"Wrote {valueToWrite}");

                await Task.Delay(TimeSpan.FromSeconds(2));
            }
        }
    }
}
Program.cs is very simple:
- It registers the
BackgroundRedisWriteras aHostedService - Calls a shared function to register the dependencies of Redis
using Microsoft.Extensions.DependencyInjection;
using Microsoft.Extensions.Hosting;
using RedisWriter;
using SharedGoodness.DependencyInjection;

var host = Host.CreateDefaultBuilder(args)
    .ConfigureServices((hostContext, serviceCollection) =>
    {
        serviceCollection.AddHostedService<BackgroundRedisWriter>();
    })
    .AddRedisDependencies()
    .Build();

host.Run();
RedisReader
The BackgroundRedisReader is the brains of this executable. It shares many similarities with the writer:
- It will wait 1 second before starting, to allow the writer a chance to set its first value
- It will continue to loop indefinitely until the cancellation token is signaled
- Each iteration it read from the Redis key that the writer has written to and log the value
- It will wait for 2 seconds before reading the next value
using Microsoft.Extensions.Hosting;
using Microsoft.Extensions.Logging;
using SharedGoodness.Redis;
using SharedGoodness.SharedUtilities;

namespace RedisReader
{
    public class BackgroundRedisReader : BackgroundService
    {
        ILogger<BackgroundRedisReader> _logger;
        IRedisRepository _redisRepository;

        public BackgroundRedisReader(ILogger<BackgroundRedisReader> logger, IRedisRepository redisRepository)
        {
            _logger = logger ?? throw new ArgumentNullException(nameof(logger));
            _redisRepository = redisRepository ?? throw new ArgumentNullException(nameof(redisRepository));
        }

        protected override async Task ExecuteAsync(CancellationToken stoppingToken)
        {
            var random = new Random();

            await Task.Delay(TimeSpan.FromSeconds(1));

            while (!stoppingToken.IsCancellationRequested)
            {
                _logger.LogInformation($"Executing again at {DateTime.Now.PrettifyDate()}");

                var currentValue = await _redisRepository.ReadFromRedis(RedisConstants.RedisKey);

                _logger.LogInformation($"Fetched {currentValue}");

                await Task.Delay(TimeSpan.FromSeconds(2));
            }
        }
    }
}
Program.cs is basically identical to the writer’s:
using Microsoft.Extensions.DependencyInjection;
using Microsoft.Extensions.Hosting;
using RedisReader;
using SharedGoodness.DependencyInjection;

var host = Host.CreateDefaultBuilder(args)
    .ConfigureServices((hostContext, serviceCollection) =>
    {
        serviceCollection.AddHostedService<BackgroundRedisReader>();
    })
    .AddRedisDependencies()
    .Build();

host.Run();
SharedGoodness Project
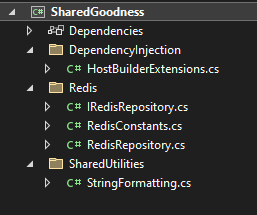
The SharedGoodness project contains just that: shared goodness that is consumed by the Reader and Writer executables.
Dotnet Docker Dependency Injection
HostBuilderExtensions.cs contains the DI function that is used in the Reader and Writer projects. It:
- Binds the shared IRedisRepository to its concrete implementation
- Registers the Microsoft Redis abstraction, passing it some hard coded configuration
- It is important to call out that if you were debugging with Redis locally on your Windows computer, you’d specify
localhost:6379however, because we are working with container to container networking, you must specify the name of the container that is running Redis. In this case, the container itself is called redis. This container name is specified in the Compose file below
- It is important to call out that if you were debugging with Redis locally on your Windows computer, you’d specify
using Microsoft.Extensions.DependencyInjection;
using Microsoft.Extensions.Hosting;
using SharedGoodness.Redis;

namespace SharedGoodness.DependencyInjection
{
    public static class HostBuilderExtensions
    {
        public static IHostBuilder AddRedisDependencies(this IHostBuilder builder)
        {
            builder.ConfigureServices((hostContext, serviceCollection) =>
            {
                // Define the distributed cache
                serviceCollection.AddStackExchangeRedisCache(options =>
                {
                    options.Configuration = "redis:6379";
                    options.InstanceName = "RedisInstance";
                });

                // Bind our Redis abstraction
                serviceCollection.AddTransient<IRedisRepository, RedisRepository>();
            });

            return builder;
        }
    }
}
Redis
The IRedisRepository is an abstraction over Redis, which standardises logging for its consumers. It exposes one method for writing to the cache and another to reading from it.
namespace SharedGoodness.Redis
{
    public interface IRedisRepository
    {
        Task WriteToRedis(string key, string value);
        Task<string> ReadFromRedis(string key);
    }
}
The concrete RedisRepository implements the above interface, by consuming the Microsoft Redis abstraction IDistributedCache
using Microsoft.Extensions.Caching.Distributed;
using Microsoft.Extensions.Logging;

namespace SharedGoodness.Redis
{
    public class RedisRepository : IRedisRepository
    {
        ILogger<RedisRepository> _logger;
        IDistributedCache _cache;

        public RedisRepository(ILogger<RedisRepository> logger, IDistributedCache cache)
        {
            _logger = logger ?? throw new ArgumentNullException(nameof(logger));
            _cache = cache ?? throw new ArgumentNullException(nameof(cache));
        }

        public async Task<string> ReadFromRedis(string key)
        {
            var value = await _cache.GetStringAsync(key);
            _logger.LogInformation($"Key {key} has value {value} at time {DateTime.Now:yyyyMMdd hh:mm:ss}");
            return value;
        }

        public async Task WriteToRedis(string key, string value)
        {
            _logger.LogInformation($"Giving key {key} value {value} at time {DateTime.Now:yyyyMMdd hh:mm:ss}");
            await _cache.SetStringAsync(key, value);
        }
    }
}
SharedUtilities
StringFormatting.cs contains a simple function to standardise how dates are written to the console.
namespace SharedGoodness.SharedUtilities
{
    public static class StringFormatting
    {
        public static string PrettifyDate(this DateTime date)
        {
            return $"{date:yyyyMMdd hh:mm:ss}";
        }
    }
}
Adding Docker Support for Multiple Projects
Now that we’ve covered the landscape of our applications, let’s take a quick look at the “moving parts” of our solution that we might want to orchestrate with Docker:
- The Redis Writer
.exe - The Redis Reader
.exe - The local instance of Redis itself
Let’s get started with Visual Studio’s Docker orchestration and extend the auto-generated foundation to support Redis.

For each executable project in the solution:
- Right click it
- Select Add
- Select Container Orchestration Support…
- Choose Docker Compose
- Choose Linux
- Click OK
This is not required for Class Libraries (DLLs) as they are not executable.
Once finished, you’ll have a Dockerfile generated for each project, which will be visible within the solution. The contents of this file will look very similar to that which we covered in the previous article.
Each Dockerfile will capture the current dependencies, by explicitly copying them during the dotnet restore stage. We’ll cover a more extensible alternative to this in another article.
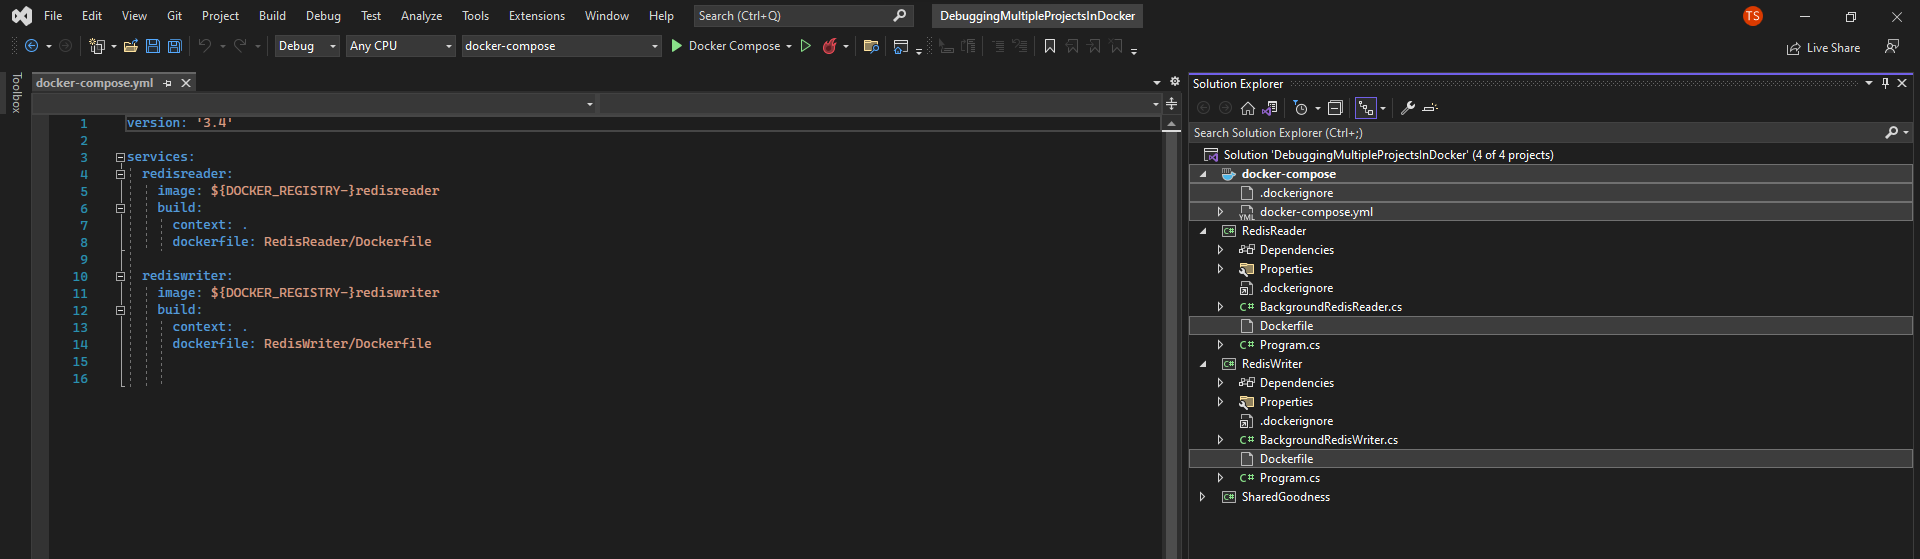
Alongside your existing projects you’ll also have a docker-compose project, with a docker-compose.yml and a .dockerignore file
Finally, in order to support running Redis alongside our applications (a critical piece of infrastructure without which our applications would not run) we need to extend the docker-compose.yml file, adding in a new service called redis. We’ll point it to the redis image in Docker Hub which will implicitly pull the latest version:
version: '3.4'

services:
  redisreader:
    image: ${DOCKER_REGISTRY-}redisreader
    build:
      context: .
      dockerfile: RedisReader/Dockerfile

  rediswriter:
    image: ${DOCKER_REGISTRY-}rediswriter
    build:
      context: .
      dockerfile: RedisWriter/Dockerfile

  redis:
    image: redis
Now, ensure that the docker-compose project is set as the default startup project by:
- Right clicking the
docker-composeproject - Selecting
Set as startup project
At this point rebuild your solution, which will cause Visual Studio to do some magic.
A Similar Story of Abstracted Simplicity
Doesn’t our Dockerfile look nice and neat? Don’t let this simplicity deceive you, though. Much like the process for debugging a single .Net Core application in Docker, Visual Studio is wonderfully hiding a large amount of complexity behind the scenes.
Let’s take a closer look at the output of a re-build.
Rebuild started...
1>------ Rebuild All started: Project: SharedGoodness, Configuration: Debug Any CPU ------
Restored C:\_dev\CodeSloth\multi project docker debugging\DebuggingMultipleProjectsInDocker\SharedGoodness\SharedGoodness.csproj (in 28 ms).
Restored C:\_dev\CodeSloth\multi project docker debugging\DebuggingMultipleProjectsInDocker\RedisReader\RedisReader.csproj (in 32 ms).
Restored C:\_dev\CodeSloth\multi project docker debugging\DebuggingMultipleProjectsInDocker\RedisWriter\RedisWriter.csproj (in 32 ms).
1>SharedGoodness -> C:\_dev\CodeSloth\multi project docker debugging\DebuggingMultipleProjectsInDocker\SharedGoodness\bin\Debug\net6.0\SharedGoodness.dll
2>------ Rebuild All started: Project: RedisWriter, Configuration: Debug Any CPU ------
3>------ Rebuild All started: Project: RedisReader, Configuration: Debug Any CPU ------
2>RedisWriter -> C:\_dev\CodeSloth\multi project docker debugging\DebuggingMultipleProjectsInDocker\RedisWriter\bin\Debug\net6.0\RedisWriter.dll
3>RedisReader -> C:\_dev\CodeSloth\multi project docker debugging\DebuggingMultipleProjectsInDocker\RedisReader\bin\Debug\net6.0\RedisReader.dll
4>------ Rebuild All started: Project: docker-compose, Configuration: Debug Any CPU ------
4>docker-compose  -f "C:\_dev\CodeSloth\multi project docker debugging\DebuggingMultipleProjectsInDocker\docker-compose.yml" -f "C:\_dev\CodeSloth\multi project docker debugging\DebuggingMultipleProjectsInDocker\docker-compose.override.yml" -p dockercompose8155732768790040920 --ansi never --profile "*" config
4>name: dockercompose8155732768790040920
4>services:
4>  redis:
4>    image: redis
4>    networks:
4>      default: null
4>  redisreader:
4>    build:
4>      context: C:\_dev\CodeSloth\multi project docker debugging\DebuggingMultipleProjectsInDocker
4>      dockerfile: RedisReader/Dockerfile
4>    image: redisreader
4>    networks:
4>      default: null
4>  rediswriter:
4>    build:
4>      context: C:\_dev\CodeSloth\multi project docker debugging\DebuggingMultipleProjectsInDocker
4>      dockerfile: RedisWriter/Dockerfile
4>    image: rediswriter
4>    networks:
4>      default: null
4>networks:
4>  default:
4>    name: dockercompose8155732768790040920_default
4>docker-compose  -f "C:\_dev\CodeSloth\multi project docker debugging\DebuggingMultipleProjectsInDocker\docker-compose.yml" -f "C:\_dev\CodeSloth\multi project docker debugging\DebuggingMultipleProjectsInDocker\docker-compose.override.yml" -f "C:\_dev\CodeSloth\multi project docker debugging\DebuggingMultipleProjectsInDocker\obj\Docker\docker-compose.vs.release.partial.g.yml" -p dockercompose8155732768790040920 --ansi never kill
4>no container to kill
4>docker-compose  -f "C:\_dev\CodeSloth\multi project docker debugging\DebuggingMultipleProjectsInDocker\docker-compose.yml" -f "C:\_dev\CodeSloth\multi project docker debugging\DebuggingMultipleProjectsInDocker\docker-compose.override.yml" -f "C:\_dev\CodeSloth\multi project docker debugging\DebuggingMultipleProjectsInDocker\obj\Docker\docker-compose.vs.release.partial.g.yml" -p dockercompose8155732768790040920 --ansi never down --rmi local --remove-orphans
4>Warning: No resource found to remove for project "dockercompose8155732768790040920".
4>docker-compose  -f "C:\_dev\CodeSloth\multi project docker debugging\DebuggingMultipleProjectsInDocker\docker-compose.yml" -f "C:\_dev\CodeSloth\multi project docker debugging\DebuggingMultipleProjectsInDocker\docker-compose.override.yml" -f "C:\_dev\CodeSloth\multi project docker debugging\DebuggingMultipleProjectsInDocker\obj\Docker\docker-compose.vs.debug.partial.g.yml" -p dockercompose8155732768790040920 --ansi never kill
4>no container to kill
4>docker-compose  -f "C:\_dev\CodeSloth\multi project docker debugging\DebuggingMultipleProjectsInDocker\docker-compose.yml" -f "C:\_dev\CodeSloth\multi project docker debugging\DebuggingMultipleProjectsInDocker\docker-compose.override.yml" -f "C:\_dev\CodeSloth\multi project docker debugging\DebuggingMultipleProjectsInDocker\obj\Docker\docker-compose.vs.debug.partial.g.yml" -p dockercompose8155732768790040920 --ansi never down --rmi local --remove-orphans
4>Warning: No resource found to remove for project "dockercompose8155732768790040920".
4>docker images --filter dangling=true --format {{.ID}}
========== Rebuild All: 4 succeeded, 0 failed, 0 skipped ==========
Here we go again. In summary we see:
- Packages being restored
- Projects being rebuilt
- A series of docker-compose commands being run, geared at validating the compose file and tearing down any existing containers that may be running
The first of these commands has been decomposed over multiple lines below:
docker-compose
-f "C:\_dev\CodeSloth\multi project docker debugging\DebuggingMultipleProjectsInDocker\docker-compose.yml"
-f "C:\_dev\CodeSloth\multi project docker debugging\DebuggingMultipleProjectsInDocker\docker-compose.override.yml"
-p dockercompose8155732768790040920
--ansi never
--profile "*"
config
Let’s break this down:
docker-composeis being invoked using the old compose CLI syntax. As discussed here the new version of compose allows you to specify the command without the hyphen-fspecifies alternate compose files by their name:- The compose file itself
- The override file
-pspecifies the project name. This name appears as the parent name of the services displayed in the Docker Dashboard--ansi neversuppresses logging of ANSI control characters--profile "*"represents a compose profile. At time of writing it isn’t clear why this is specified, given that the default compose launcher runs all services, and explicit service names are specified for conditional launching of services- config represents the actual command, which validates and outputs the compose file represented by overrides
After this step, the existing containers are torn down through a series of kill and down commands
docker-compose
-f "C:\_dev\CodeSloth\multi project docker debugging\DebuggingMultipleProjectsInDocker\docker-compose.yml"
-f "C:\_dev\CodeSloth\multi project docker debugging\DebuggingMultipleProjectsInDocker\docker-compose.override.yml"
-f "C:\_dev\CodeSloth\multi project docker debugging\DebuggingMultipleProjectsInDocker\obj\Docker\docker-compose.vs.release.partial.g.yml"
-p dockercompose8155732768790040920
--ansi never
kill
Let’s break this command down:
- Similarly to the prior command, we see files provided, a project name and specification of ANSI control character suppression
- The kill command itself, to kill any existing containers of the project
We’ll touch on the additional partial file below. Moving onto the next command:
docker-compose
-f "C:\_dev\CodeSloth\multi project docker debugging\DebuggingMultipleProjectsInDocker\docker-compose.yml"
-f "C:\_dev\CodeSloth\multi project docker debugging\DebuggingMultipleProjectsInDocker\docker-compose.override.yml"
-f "C:\_dev\CodeSloth\multi project docker debugging\DebuggingMultipleProjectsInDocker\obj\Docker\docker-compose.vs.release.partial.g.yml"
-p dockercompose8155732768790040920
--ansi never
down
--rmi local
--remove-orphans
Let’s break down this command:
- The parameters of this command match the prior
- This action is
downwhich will stop and remove the containers and networks of the compose file --remove-orphanswill remove containers for services now defined in the Dockerfile
The exact same steps are then repeated for debug builds:
docker-compose
-f "C:\_dev\CodeSloth\multi project docker debugging\DebuggingMultipleProjectsInDocker\docker-compose.yml"
-f "C:\_dev\CodeSloth\multi project docker debugging\DebuggingMultipleProjectsInDocker\docker-compose.override.yml"
-f "C:\_dev\CodeSloth\multi project docker debugging\DebuggingMultipleProjectsInDocker\obj\Docker\docker-compose.vs.debug.partial.g.yml"
-p dockercompose8155732768790040920
--ansi never
kill

docker-compose
-f "C:\_dev\CodeSloth\multi project docker debugging\DebuggingMultipleProjectsInDocker\docker-compose.yml"
-f "C:\_dev\CodeSloth\multi project docker debugging\DebuggingMultipleProjectsInDocker\docker-compose.override.yml"
-f "C:\_dev\CodeSloth\multi project docker debugging\DebuggingMultipleProjectsInDocker\obj\Docker\docker-compose.vs.debug.partial.g.yml"
-p dockercompose8155732768790040920
--ansi never
down
--rmi local
--remove-orphans
This is our first time seeing docker-compose.vs.release.partial.g.yml and docker-compose.vs.debug.partial.g.yml. Time for a side-quest!
Sloth Side Quest
Let’s look into docker-compose.debug.partial.g.yml specifically, as we are understanding how to debug our multi project appications. The partial release file is a subset of this:
version: '3.4'

services:
  redisreader:
    image: redisreader:dev
    container_name: RedisReader
    build:
      target: base
      labels:
        com.microsoft.created-by: "visual-studio"
        com.microsoft.visual-studio.project-name: "RedisReader"
    environment:
      - NUGET_FALLBACK_PACKAGES=/root/.nuget/fallbackpackages
    volumes:
      - C:\_dev\CodeSloth\multi project docker debugging\DebuggingMultipleProjectsInDocker\RedisReader:/app
      - C:\_dev\CodeSloth\multi project docker debugging\DebuggingMultipleProjectsInDocker:/src
      - C:\Users\TJ\vsdbg\vs2017u5:/remote_debugger:rw
      - C:\Users\TJ\.nuget\packages\:/root/.nuget/packages:ro
      - C:\Program Files\dotnet\sdk\NuGetFallbackFolder:/root/.nuget/fallbackpackages:ro
    entrypoint: tail -f /dev/null
    labels:
      com.microsoft.visualstudio.debuggee.program: "dotnet"
      com.microsoft.visualstudio.debuggee.arguments: " --additionalProbingPath /root/.nuget/packages --additionalProbingPath /root/.nuget/fallbackpackages  \"/app/bin/Debug/net6.0/RedisReader.dll\""
      com.microsoft.visualstudio.debuggee.workingdirectory: "/app"
      com.microsoft.visualstudio.debuggee.killprogram: "/bin/sh -c \"if PID=$$(pidof dotnet); then kill $$PID; fi\""
    tty: true
  rediswriter:
    image: rediswriter:dev
    container_name: RedisWriter
    build:
      target: base
      labels:
        com.microsoft.created-by: "visual-studio"
        com.microsoft.visual-studio.project-name: "RedisWriter"
    environment:
      - NUGET_FALLBACK_PACKAGES=/root/.nuget/fallbackpackages
    volumes:
      - C:\_dev\CodeSloth\multi project docker debugging\DebuggingMultipleProjectsInDocker\RedisWriter:/app
      - C:\_dev\CodeSloth\multi project docker debugging\DebuggingMultipleProjectsInDocker:/src
      - C:\Users\TJ\vsdbg\vs2017u5:/remote_debugger:rw
      - C:\Users\TJ\.nuget\packages\:/root/.nuget/packages:ro
      - C:\Program Files\dotnet\sdk\NuGetFallbackFolder:/root/.nuget/fallbackpackages:ro
    entrypoint: tail -f /dev/null
    labels:
      com.microsoft.visualstudio.debuggee.program: "dotnet"
      com.microsoft.visualstudio.debuggee.arguments: " --additionalProbingPath /root/.nuget/packages --additionalProbingPath /root/.nuget/fallbackpackages  \"/app/bin/Debug/net6.0/RedisWriter.dll\""
      com.microsoft.visualstudio.debuggee.workingdirectory: "/app"
      com.microsoft.visualstudio.debuggee.killprogram: "/bin/sh -c \"if PID=$$(pidof dotnet); then kill $$PID; fi\""
    tty: true
The contents of each service in this file are reminiscent of the Dockerfile in our last article. For our two exectuable applications we see:
- A
devimage name being built - The compose file targeting only the
basestage of the respective Docker file - Environment variable being set for NuGet packages that had previously been restored to the local disk
- Volumes being mounted for:
- The compiled app
- The apps source code (for remote debugging)
- The remote debugging tools
- The primary NuGet packages
- The fallback NuGet packages
- An entry point being set to the
tailwith the null device to keep the container running - A teletype being allocated
Running the Thing!
Now we understand that compose is behaving in a very similar way to debugging a single Dockerfile, we can run our newly created compose file.
docker-compose
-f "C:\_dev\CodeSloth\multi project docker debugging\DebuggingMultipleProjectsInDocker\docker-compose.yml"
-f "C:\_dev\CodeSloth\multi project docker debugging\DebuggingMultipleProjectsInDocker\docker-compose.override.yml"
-f "C:\_dev\CodeSloth\multi project docker debugging\DebuggingMultipleProjectsInDocker\obj\Docker\docker-compose.vs.debug.g.yml"
-p dockercompose8155732768790040920
--ansi never
up -d --build --remove-orphans
If you swap to the build output window you’ll see that Visual Studio, on running our application(s), issues a docker compose up command. Let’s take a quick look at the additional up specific parameters of this command:
-drun the containers in detached mode--buildbuilds images before running--remove-orphansonce again removes orphaned containers that are no longer specified in the compose file
Note: the contents of the debug.g.yml and partial file are the same.
Now, for the moment(s) of truth!
Firstly, if we open the Docker Dashboard, we’ll see our new composed services running happily:
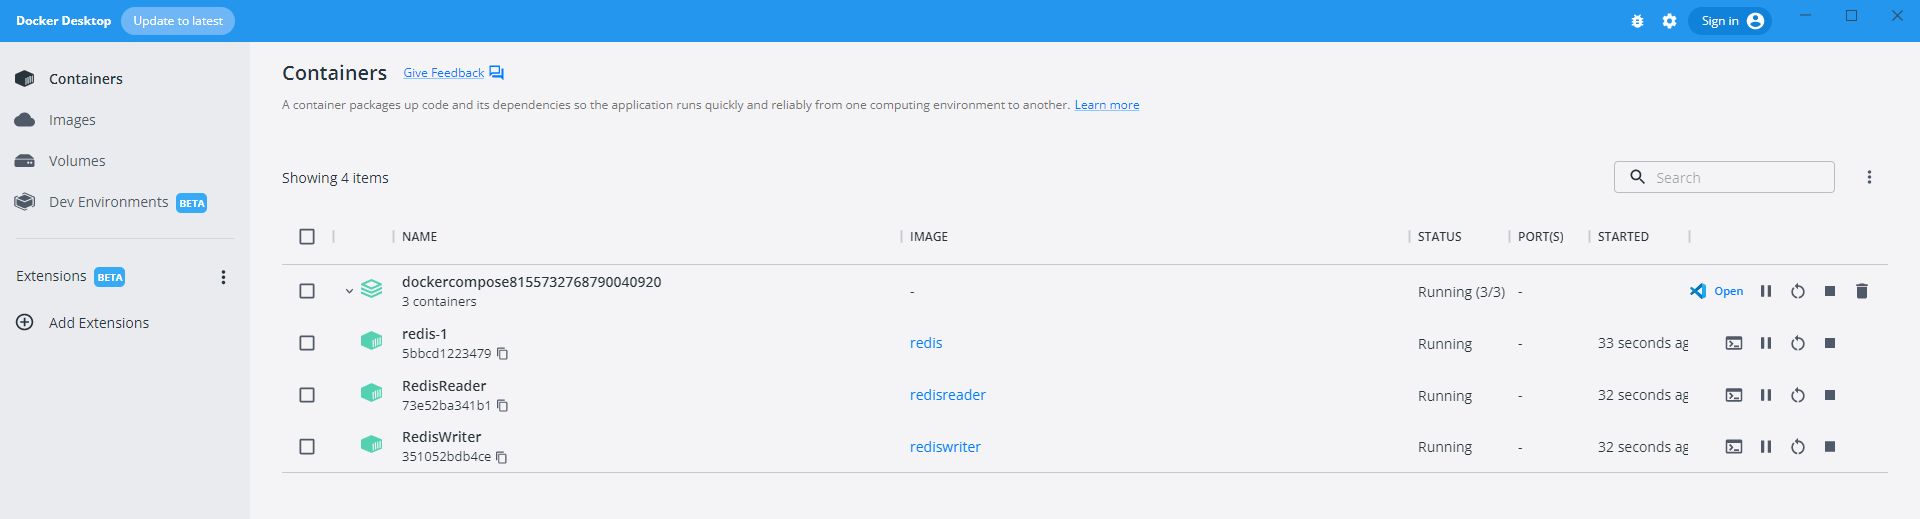
Here we can see each of our three required services running under the parent project name:
- Both of the applications that we have authored
- The Redis cluster that they depend on
Now, let’s take a look at the apps themselves! But wait… no console windows have popped up?!
Viewing Application Logs for Running Containers in Visual Studio
The first way is to view the logs of a single running container. In order to achieve this, open the Containers window: View -> Other windows -> Containers. Alternatively you can use the CTRL + K, CTRL + O key chord.
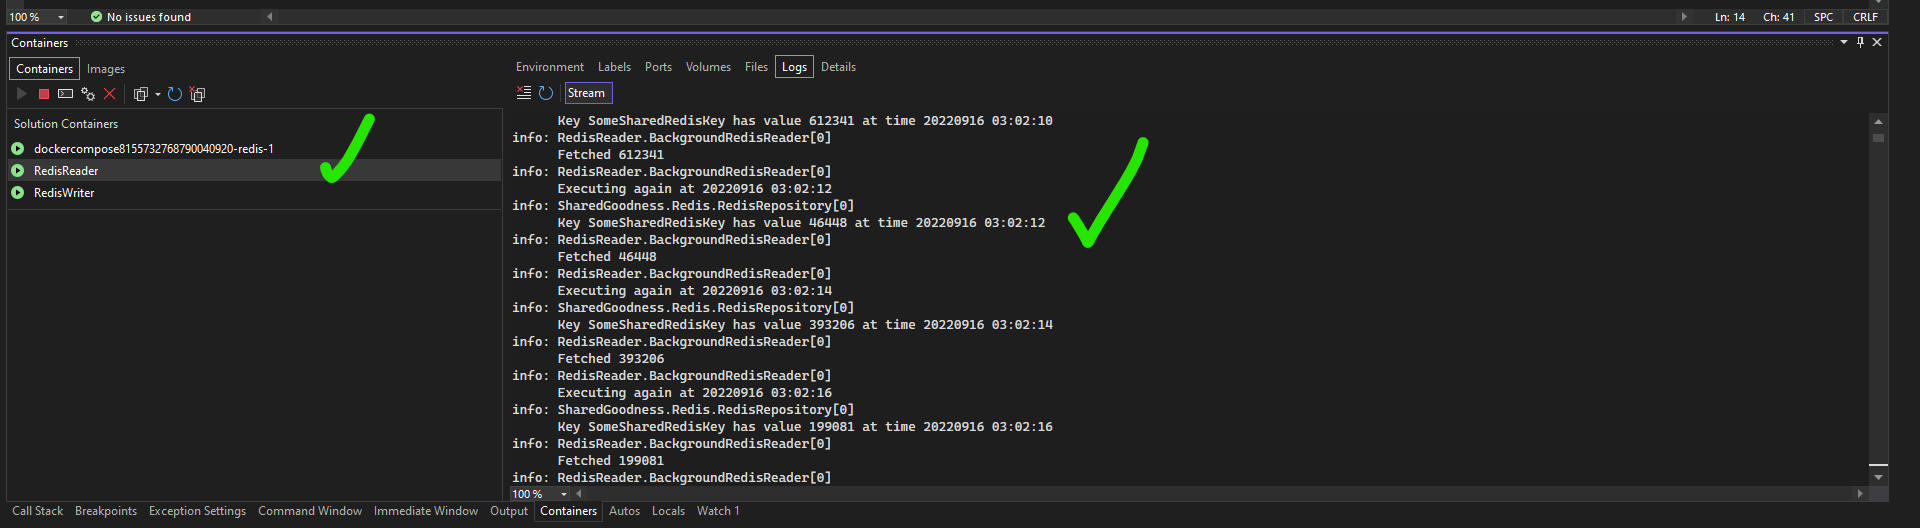
In the Containers window you’ll be able to select the running contain that you’d like to inspect, followed by clicking the Logs tab on the right hand window. Each message that is written to the console will appear here.
This strategy is great when laser focusing on debugging a specific application. However, sometimes it is helpful to view all of our logs alongside each other for context. In this case, it would be great to visually confirm that the RedisWriter is writing the same value that the RedisReader is actually fetching.
In order to achieve this, open the Output window: View -> Output, or use CTRL + Alt + O.
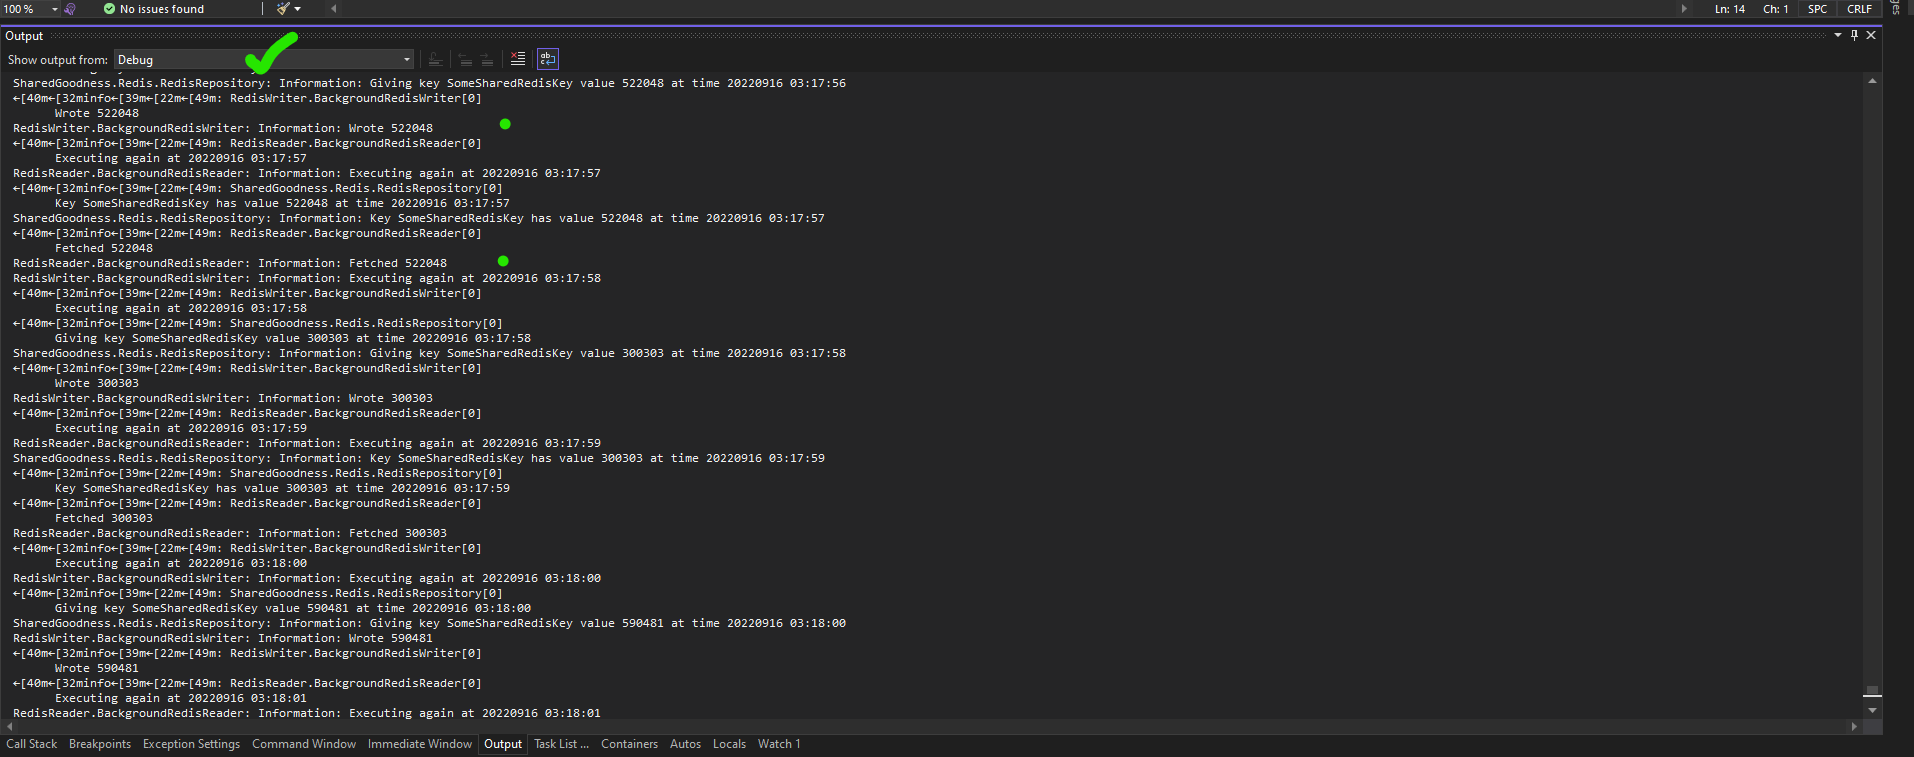
In the Output window, choose show output from debug. In this screenshot we can see a green dot next to each of our applications logs. This confirms to use that the RedisReader is fetching the same value set by the RedisWriter!
At this point you are able to set breakpoints in your code and continue enjoying your local Windows development experience through Visual Studio. However, you’re now doing it from inside multiple Docker containers!
Now, stop debugging your solution. If you observe the Docker Dashboard at this point, the compose file and its services will still be running. Return to Visual Studio and this time rebuild the solution. Once this has completed you’ll notice that Docker Dashboard no longer has the compose file and services,
This demonstrates that Visual Studio is creating long running container that do not terminate when our application ends, and that the explicit “tear down” steps of the rebuild process are required to clean these resources up.
Infrastructure Management and Conditional Service Debugging
The case that we have covered above is great when we want to run all of our services at once. However, there may be times when we only want to run a single service in our solution. This is where Visual Studio continues to shine as our Integrated Development Environment. Through the configuration of different launch profiles, we can tell Visual Studio which parts of our Compose file we would actually like to orchestrate!
Click the caret next to the Docker Compose play button and select Manage Docker Compose Launch Settings, as below:

This will load the default launch profile:
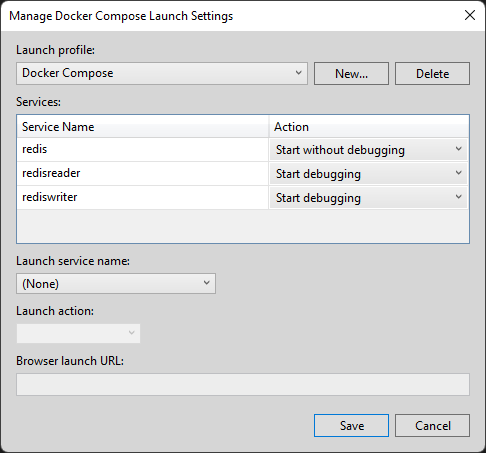
As we can see here, the default Docker Compose launch profile runs both of our applications with the debugger attached, and runs Redis without the debugger.
Click the New button, and give the profile a name.
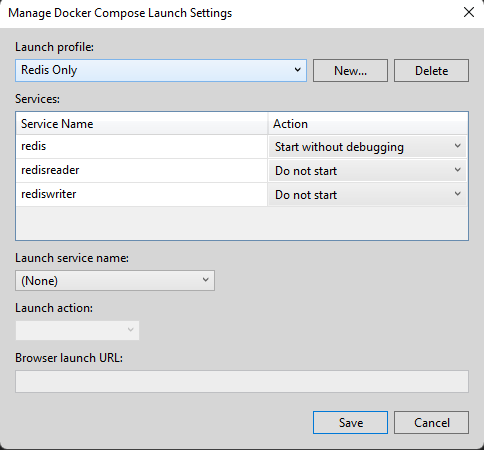
The example of a Redis Only profile will only run Redis. This will will allow us to run our infrastructure separate from the app and keep the Redis container running across multiple debug sessions of our apps.
A second profile is required to launch just the reader and writer applications, which can be created after clicking Save.
Each new set of launch settings that you create will then appear in the play button dropdown.
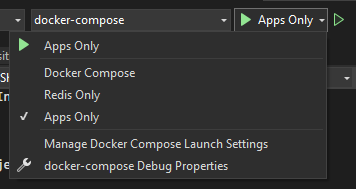
With this setup we would first select Redis Only and run it. Then we would select Apps Only and start only our apps, in debug mode.
When running our apps this time, the Docker Compose command looks slightly different:
docker-compose
-f "C:\_dev\CodeSloth\multi project docker debugging\DebuggingMultipleProjectsInDocker\docker-compose.yml"
-f "C:\_dev\CodeSloth\multi project docker debugging\DebuggingMultipleProjectsInDocker\docker-compose.override.yml"
-f "C:\_dev\CodeSloth\multi project docker debugging\DebuggingMultipleProjectsInDocker\obj\Docker\docker-compose.vs.debug.g.yml"
-p dockercompose8155732768790040920
--ansi never
up
-d
--no-build
redisreader rediswriter
When orchestrating explicit parts of the Docker file you’ll notice the specific service names specified in the build command.
Sloth Summary
There we have it! Debugging multiple projects in Docker with Visual Studio, while also ensuring we have supporting infrastructure running!
In summary:
- Right click your projects and select the option to add orchestration support
- Define launch settings to ensure that you are able to spin up only the services that you require
- Ensure that you remember that we are working with container to container networking and to refer to the respective container’s name instead of
localhost