Happy 2025! This article is a divergence from previous posts, as this little Code Sloth is getting started with OpenSearch in Java! Moving forward, new blog post content will likely be written in Java, with some old content re-written to support a Java audience. For the moment, posts will continue to target the Windows operating system.
Come with me on this new adventure by jumping head first into the beginnings of the java Code Sloth Code Samples!
Oh boy, the content of this article will not stand the test of time (👋oh hey, future me) … Live in the now, I guess?
What You’ll Need for Getting Started With OpenSearch in Java
There are a few pre-requisite installations to get up and running with the Java Code Sloth samples.
Git
Why is this needed?
Git is a version management tool for software development. We need git to be able to clone the repository of code from the Code Sloth code samples page on GitHub.
Where to download Git
Firstly, you’ll need to download Git for Windows from here.
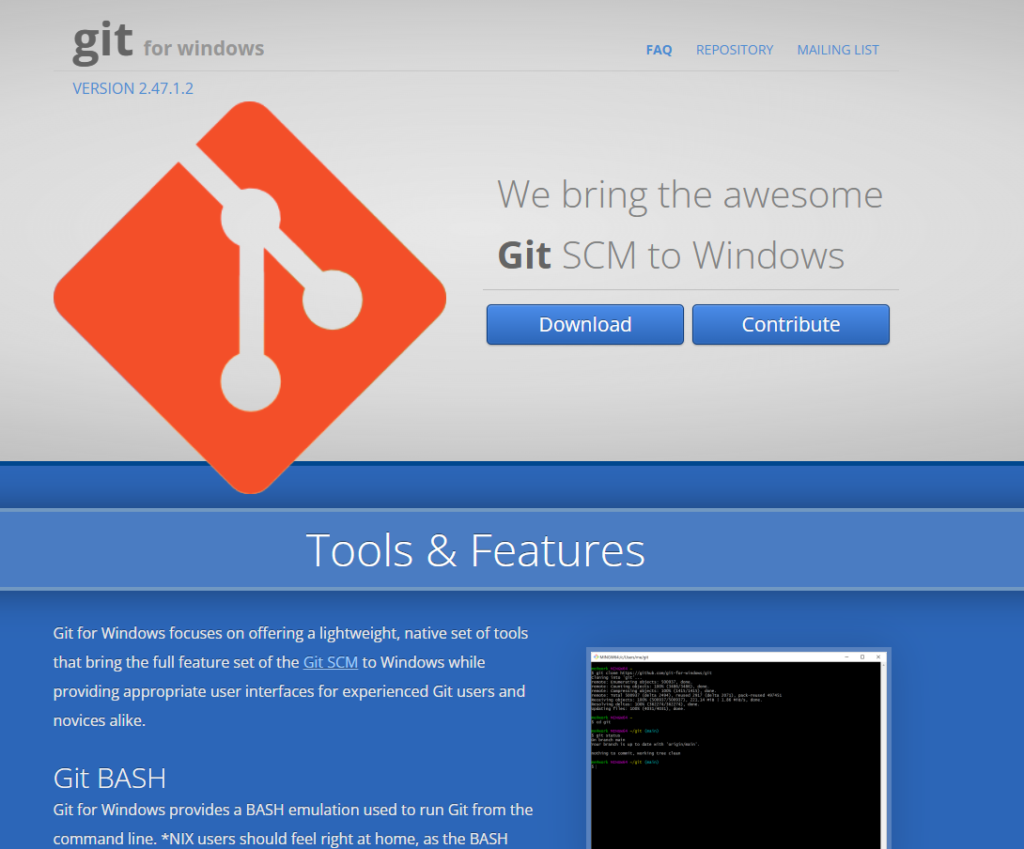
Go ahead and click on that big ‘ol Download button to get started.
Double click the installer from your download directory and grant permission to install.

Agree to the licence information by clicking Install. This will extract files into Program Files.

That was easy – you’re done! Click finish.
GitHub Desktop
Why is this needed?
I prefer to use GitHub desktop when getting setup, because it makes cloning repositories incredibly simple – there’s a button for it on each repository’s page!
Without this tool, you’ll need to either use another Git Graphical User Interface (GUI), or the command line to clone the repository.
A wise Code Sloth takes the simplest, most pragmatic path to their goals, afterall 🦥
Where to download GitHub Desktop
Head over to the GitHub Desktop download page here.
Double click the installer from your download directory and follow the prompts.
Docker Desktop
Why is this needed?
Docker Desktop will be used to run our OpenSearch cluster locally. Through the magic of a Docker Compose yaml file, we can configure how a cluster should run (or copy a sample from the OpenSearch website 😉), and without needing to know anything more have it run!
Containerising our infrastructure in this way means that we can make it ephemeral. It doesn’t need to live longer than the tests that we run. You will never have to worry about manually running OpenSearch, tearing it down, or deleting any data that it may have saved to the computer’s disk.
It’ll be as though it was never there – unless we need to debug it, of course.
Where to download Docker Desktop
Head over to the Docker Desktop page here and create a free account. This has become a bit of a maze in recent years.
You’ll only be able to download Docker (for free) once you log into the account – don’t be frightened off by the many “choose plan” buttons!
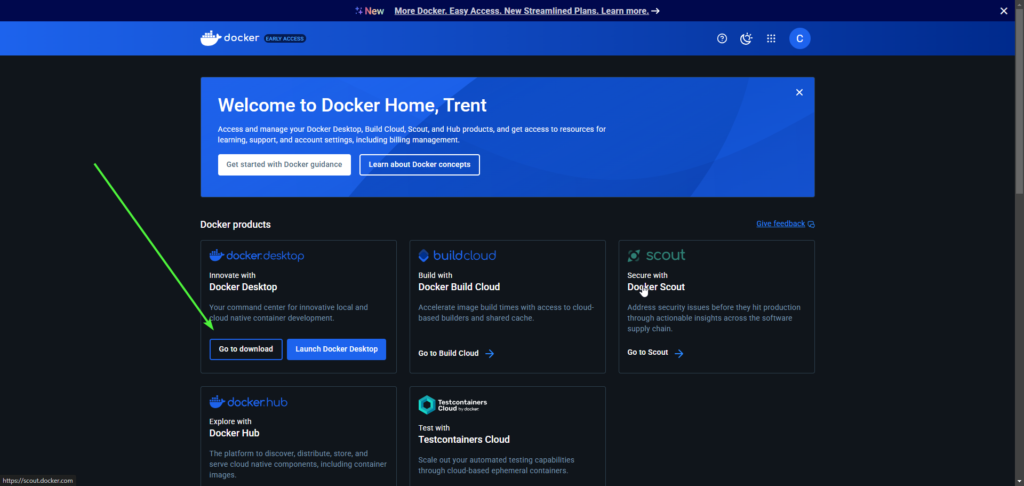
Once you have signed in, click the Go To Download button under the Docker Desktop product.
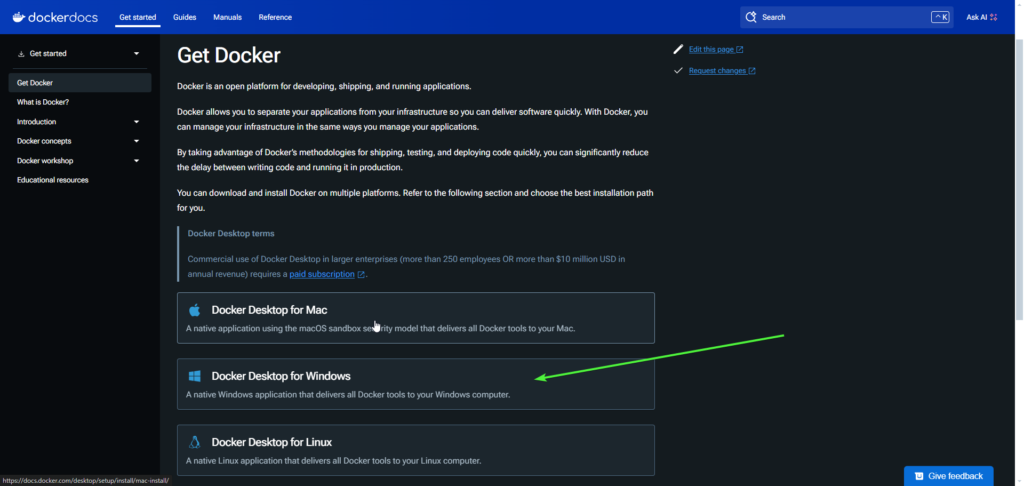
Then click on Docker Desktop for Windows
Followed by selecting your architecture (hint it’s likely x86_64).
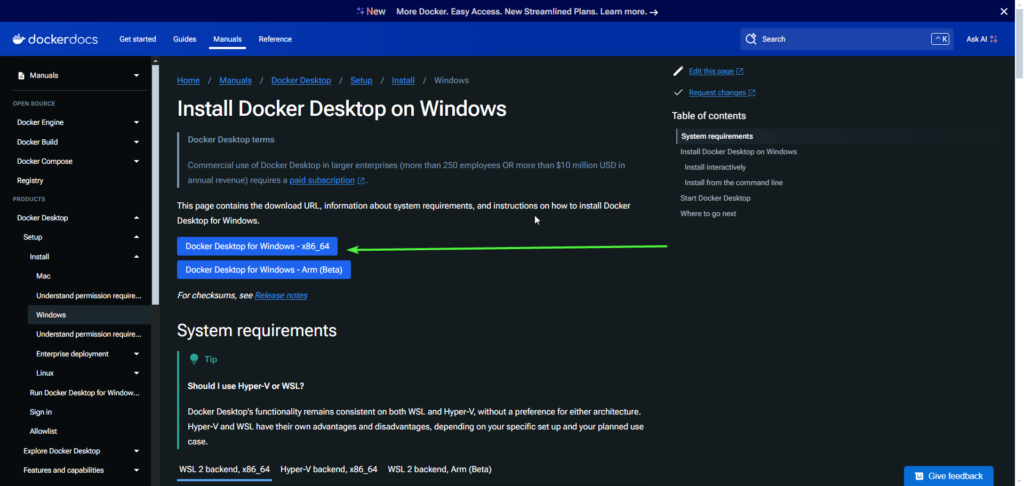
Double click the downloaded installer and follow the prompts to install.
IntelliJ IDEA Community Edition
Why is this needed?
IntelliJ IDEA Community Edition is a free Integrated Development Environment (IDE) for Java. This is where code can written, compiled and debugged. We’ll jump into debugging some of the Code Sloth OpenSearch Java samples once we’re set up.
Where to download IntelliJ IDEA Community Edition?
Head over to the download page here, scroll past the Ultimate paid version (hehe) and click download under the Community Edition heading.
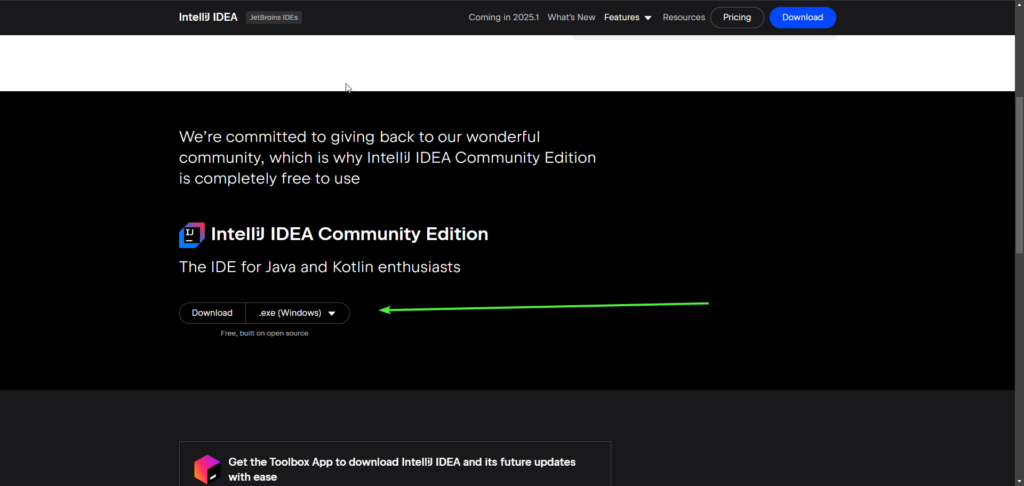
Double click the downloaded installer and follow the prompts.
Download the Code Sloth OpenSearch Java Samples Repo
Now that we have our tools ready to go, we can clone the repository from GitHub.
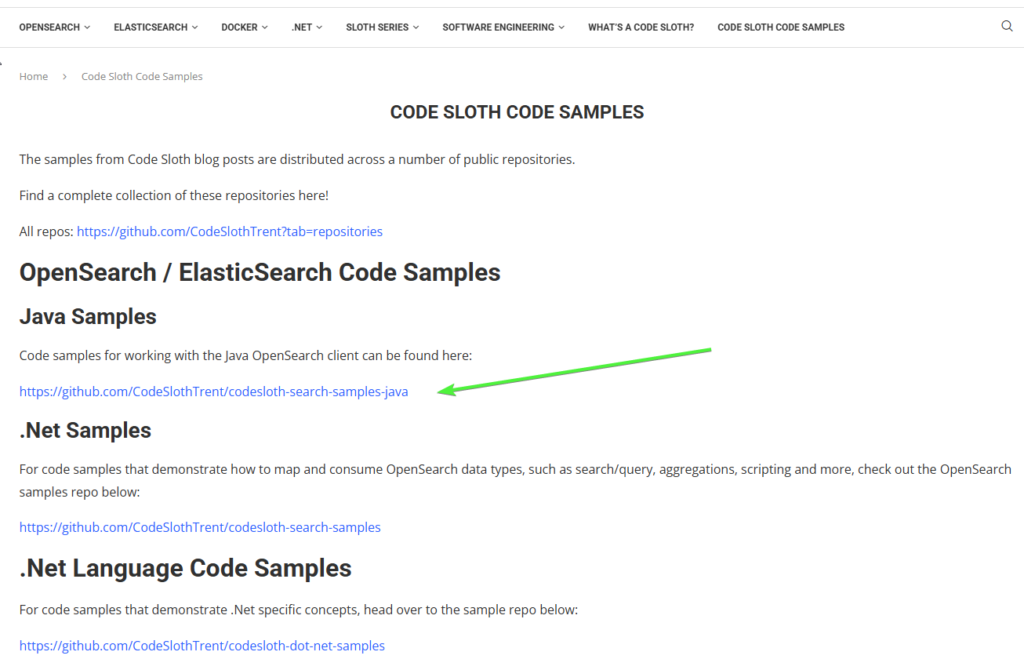
Head over to the Code Sloth Code Samples page and click the link to the Java code samples.
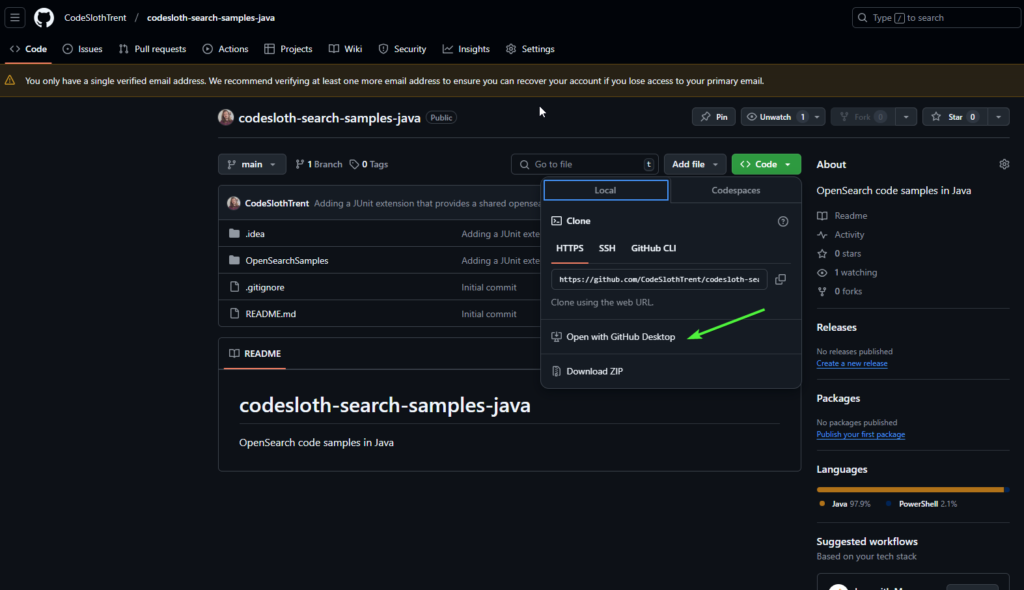
Once the GitHub page has loaded, click on the green Code button and select Open with GitHub Desktop.
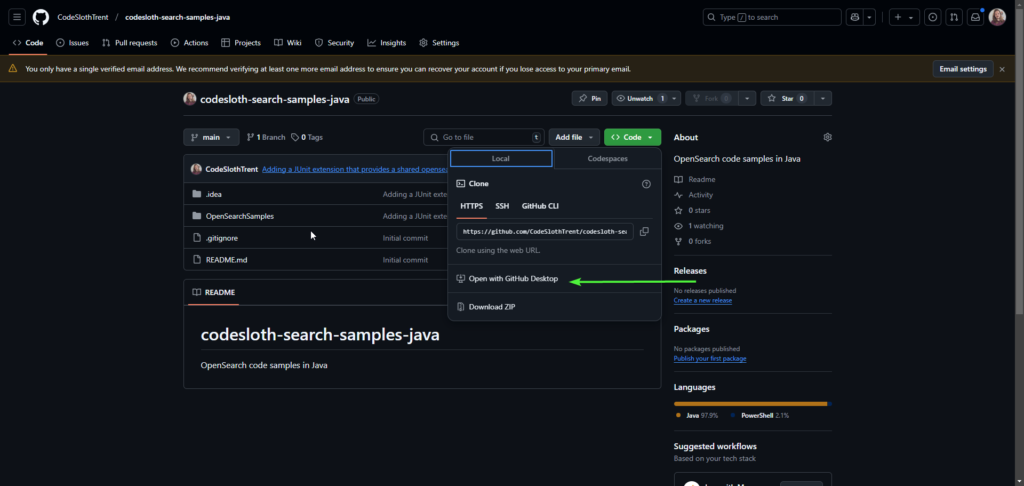
Acknowledge the prompt

Select a folder to download the repository to and click Clone.

The repo will be cloned and opened

Open the Repo in IntelliJ IDEA
Now that we have downloaded the source code from the repository to our computer, we need to open the Java project in IntelliJ.
Launch IntelliJ IDEA Community Edition. On the projects view select Open.

Select the top-level folder codesloth-search-samples-java and click Open.
This will open the project for you!
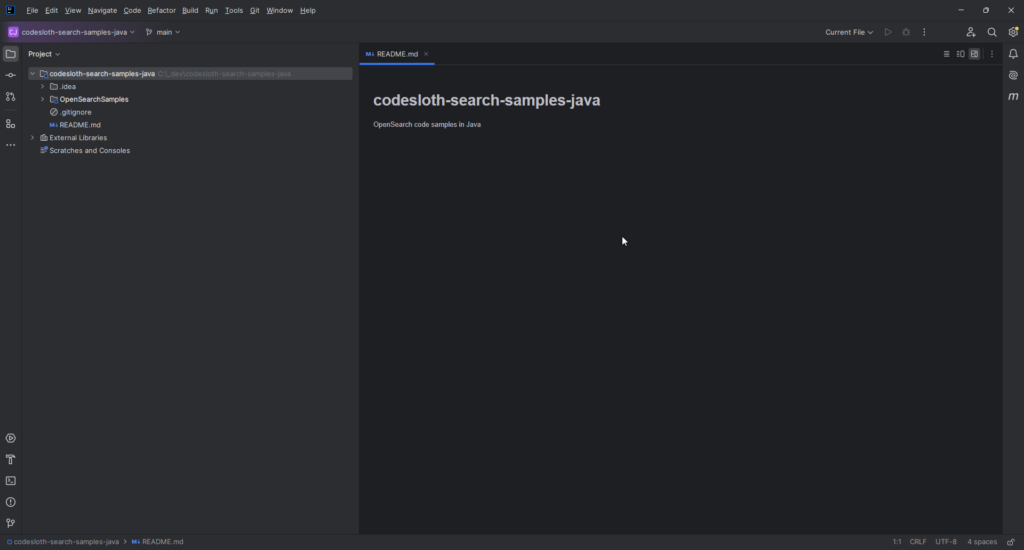
Explaining Code Setup
Infrastructure folder
Expand OpenSearchSamples -> infrastructure folder.
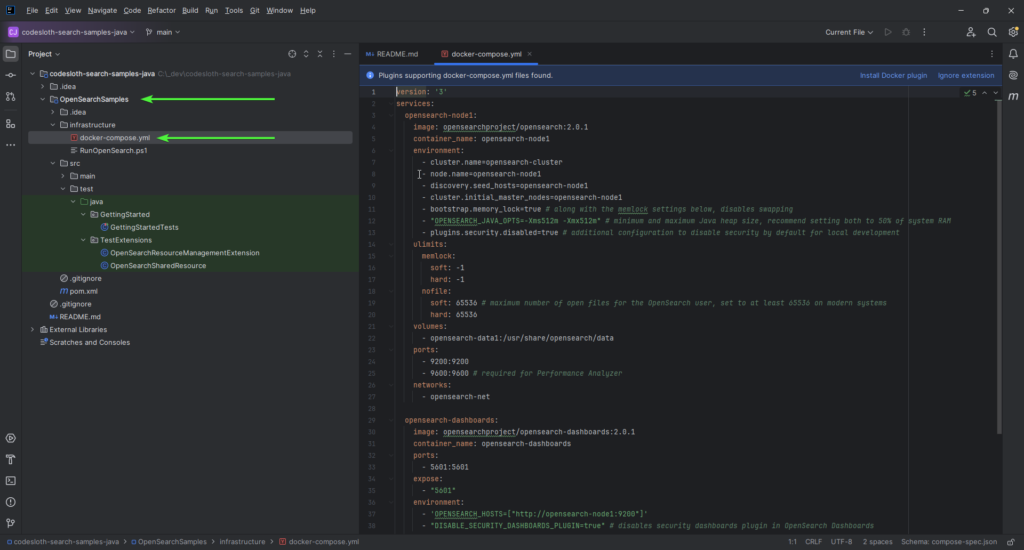
This contains the docker-compose.yml file that will create an OpenSearch cluster for the tests to consume.
Test Extensions for Orchestrating the OpenSearch Cluster
Expand src -> test -> java -> TestExtensions.
This contains a class called OpenSearchResourceManagementExtension which is responsible for calling docker-compose up with the infrastructure docker-compose.yml file before the tests begin; waiting for this process to complete.
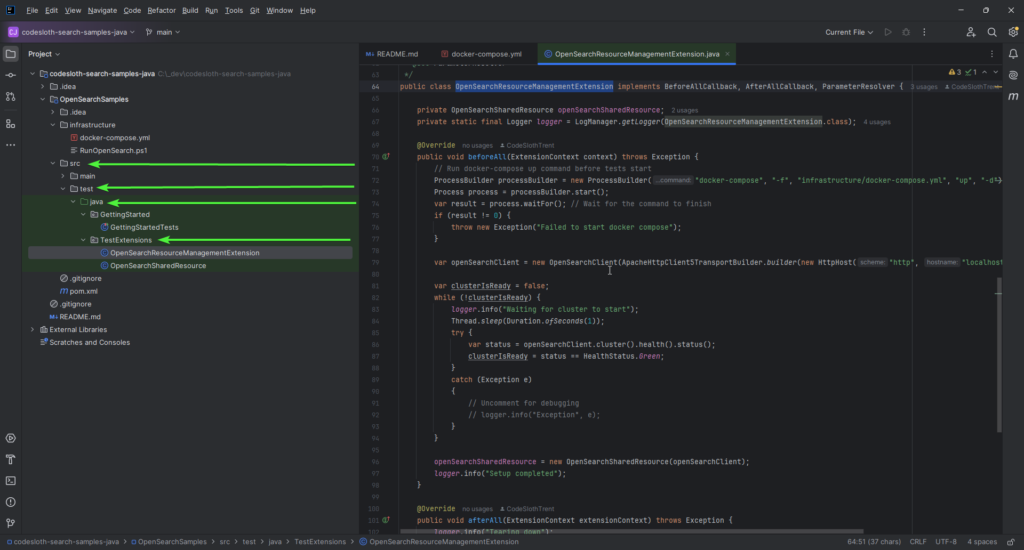
It then creates an OpenSearchClient that is shared by all tests, which it uses to ensure that the cluster has properly loaded before proceeding. This step is crucial, as OpenSearch can take several seconds to load before it will accept HTTP connections.
If you query the cluster while it is starting, an exception will be thrown indicating that the connection closed by peer. With this strategy in place each test can now confidently consume the OpenSearch client without worrying about startup race conditions!
Getting Started Tests
Just above the TestExtensions folder is another called GettingStartedTests.
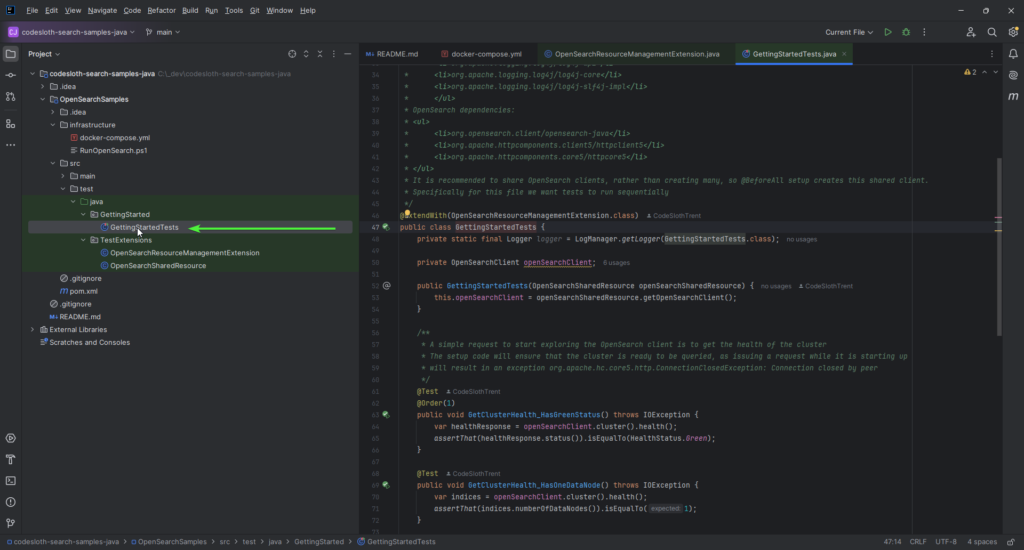
These tests perform the following basic cluster operations:
- Check that the cluster has a healthy
greenstatus - Check that the cluster has a single data node running
- Create a bare-minimum index, query for it by name, and then delete it
Getting Started with OpenSearch in Java by Running Your First Test!
There are a couple of different ways that these tests can be run.
Via Project Structure
Open the Project Structure view by clicking the 3 squares on the left of the IDE.
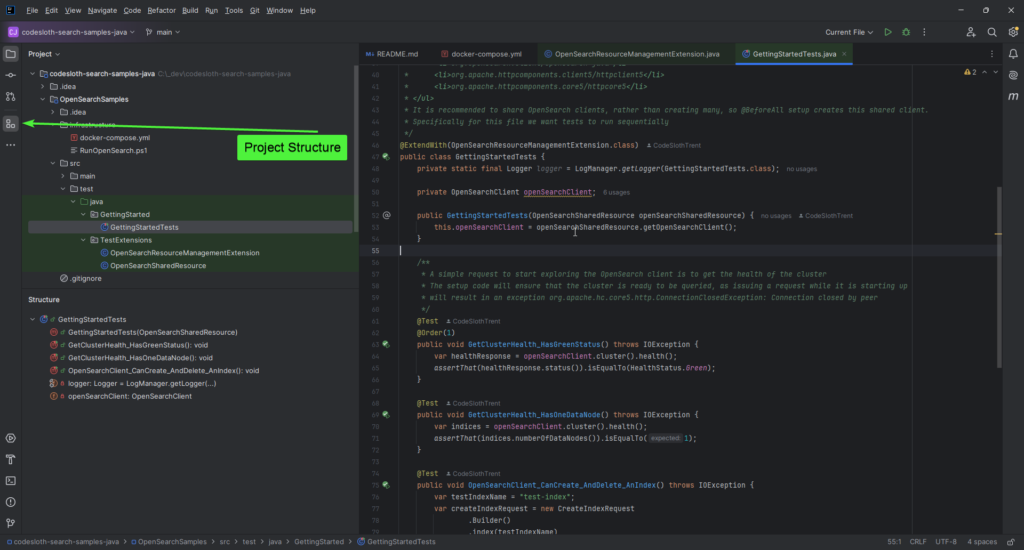
As we can see in the screenshot above, this creates a panel called Structure under the Project panel that was previously using the full height of the IDE.
From here, you can right-click the top-level class and choose to Run or Debug the tests.

You can also do the same for any test method that appears in this view too!
Via Gutter Buttons
You’ll notice that there are a bunch of green play buttons to the left of the class and method names in the file.
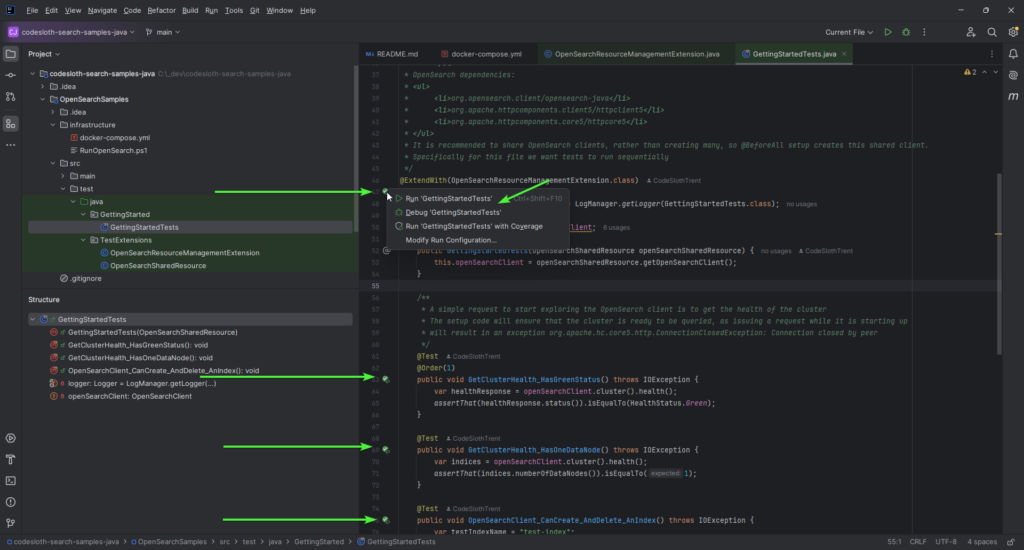
If you left-click on one of these you will have the option to Run or Debug the entity.
Observing the Test Output
Running the GetClusterHealth_HasGreenStatus method will open the Run window at the bottom of the IDE.
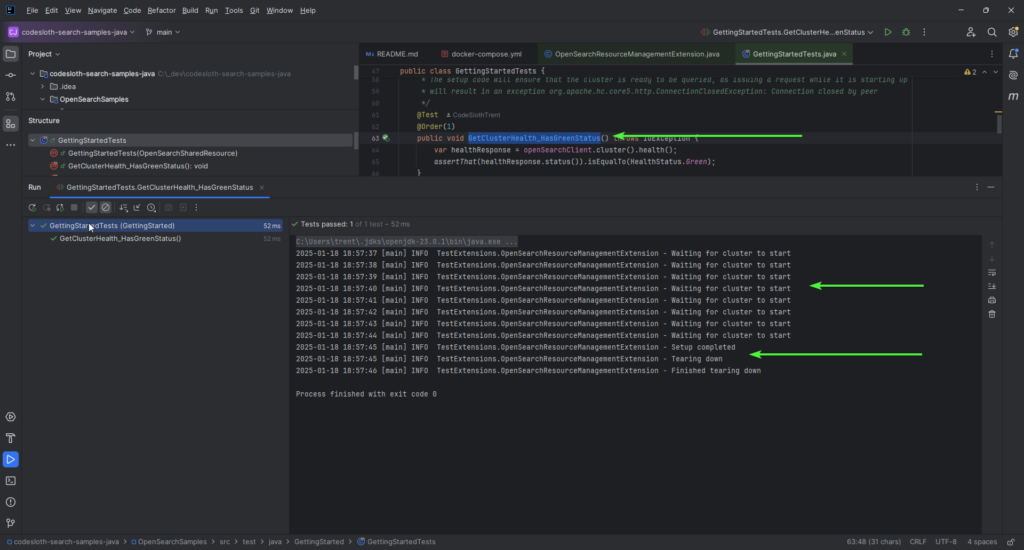
Here you can observe the test logs that are produced while the test is running.
We can see that we waited for the cluster to start and completed setup. After this, our test executed, and then we proceeded into tearing down the cluster.
The green tick to the left of the test method name in the run window indicates that it was successful.
Observing the OpenSearch Infrastructure Lifecycle
If you click on number 64 in the gutter of the text-editor for the test, it will set a breakpoint (visualised as a red dot). Alternatively you can press CTRL + F8 when your curor is on the line.

This time, debug the test. When the breakpoint is hit, the debugger will pause on the line.
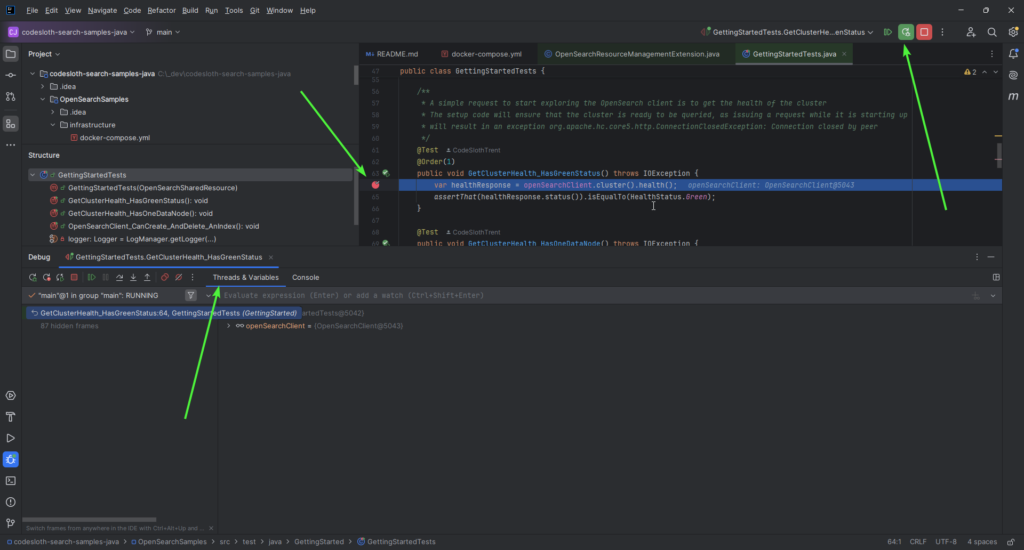
In the screenshot above, we can se three indicators that the debugger has paused:
- A series of play/stop buttons appears in the top right of the IDE
- The breakpoint shows a check mark on it
- The Threads & Variables window appears at the bottom of the screen
This is not entirely interesting in itself. However, now that we have paused the execution of the test, we can view the OpenSearch infrastructure running in Docker.
Launch Docker desktop.
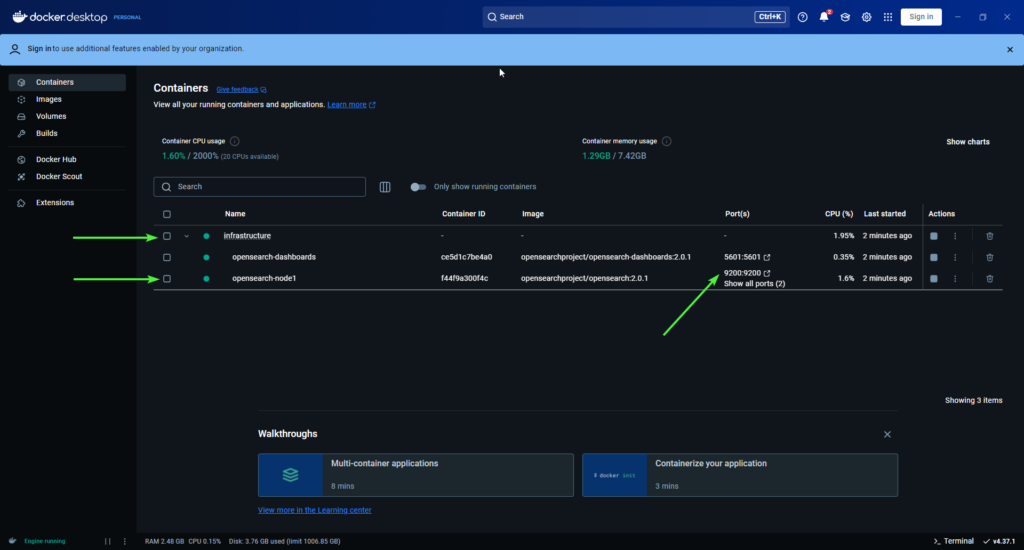
Here we can see that the OpenSearch docker-compose is running for us.
infrastructure is the folder that the compose file was launched from and is used to group each container that the compose file has launched together.
We can also see that an opensearchproject/opensearch:2.0.1 image is being run, and has exposed post 9200. Also, OpenSearch Dashboards are running in another container and can be accessed via port 5601.
This article has barely skimmed the surface of Docker. Related learning resources can be found in the Code Sloth blog:
Finally, if you return to IntelliJ IDEA and either click the leftmost green play button, or press F9, the test will complete (and pass).
Return to Docker Desktop and see that the infrastructure is now gone!
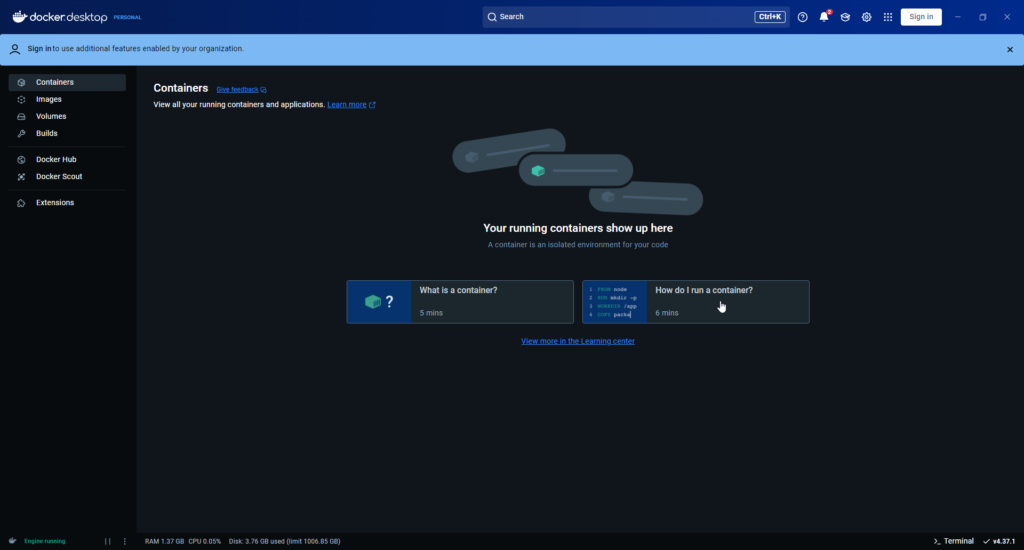
Having the infrastructure managed in this way means that we can reliably reproduce our testing environment. Determinism in testing is essential, especially for integration tests such as this! Now there is no risk of lingering OpenSearch indices during testing, as we purge all volumes.
Just be sure to let the tests run to completion so the containers are torn down. If you accidentally cancel the tests, don’t panic. You can do this manually.
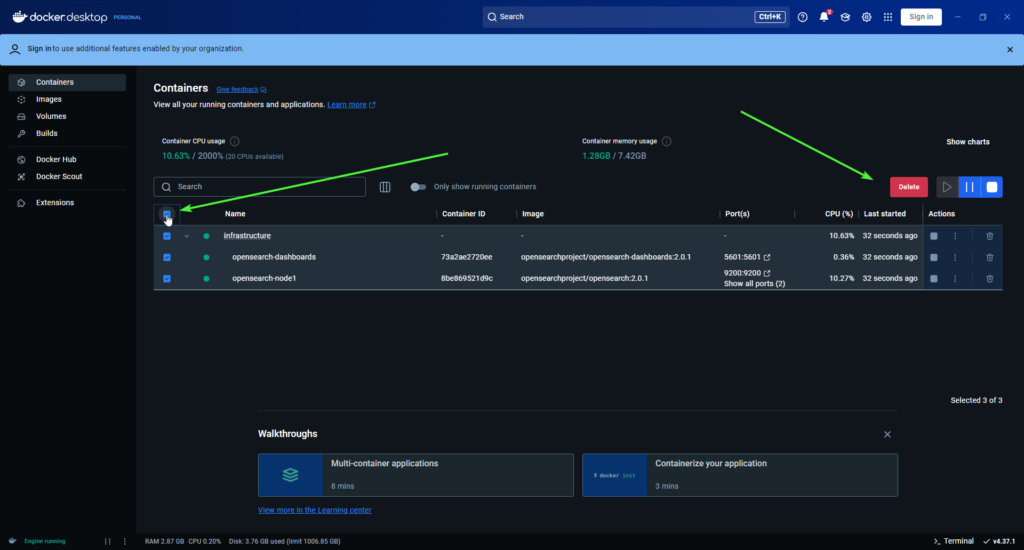
Firstly, select all containers, and then click Delete.
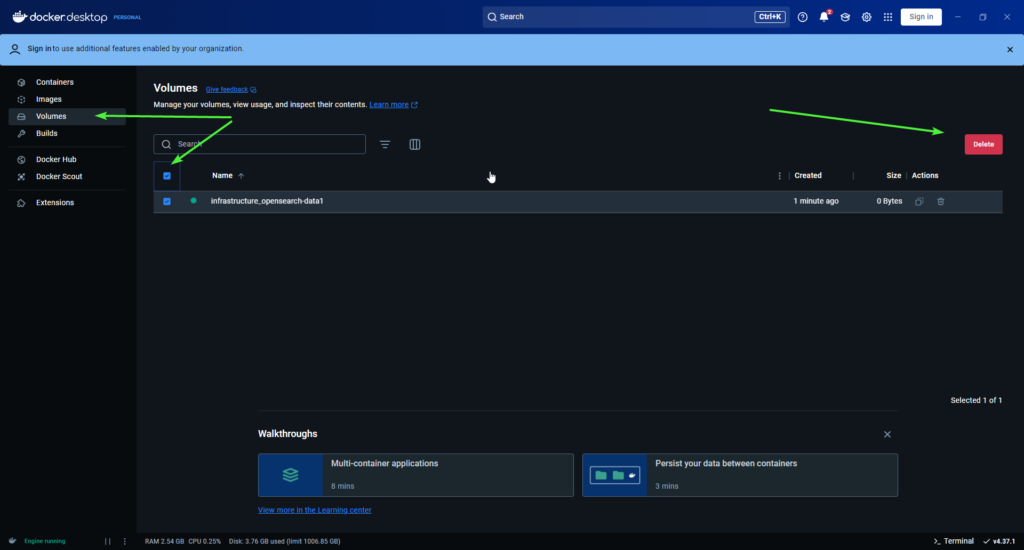
Then, manually remove the volume, by clicking the Volumes menu, select the volume and clicking Delete
Alternatively, you can do this on the command line by navigating to the infrastructure folder and running
docker-compose down --volumes
Then you’ll be running from a clean slate again.
Sloth Summary: Getting Started with OpenSearch in Java
That’s it! We’ve come a long way, so let’s recap:
- We downloaded the software required to:
- Clone the Code Sloth Code Samples Java Git repository from GitHub
- Git
- GitHub Desktop
- Run our OpenSearch cluster’s containers
- Docker Desktop
- Run our tests
- IntelliJ IDEA Community Edition
- Clone the Code Sloth Code Samples Java Git repository from GitHub
- Cloned the code samples repo
- Ran and debugged the tests
- Observed the OpenSearch infrastructure lifecycle
Keep an eye out for more Java OpenSearch posts as we continue to explore the Java OpenSearch client. Happy Code Slothing! 🦥

